

Moving Map#
Introduction#
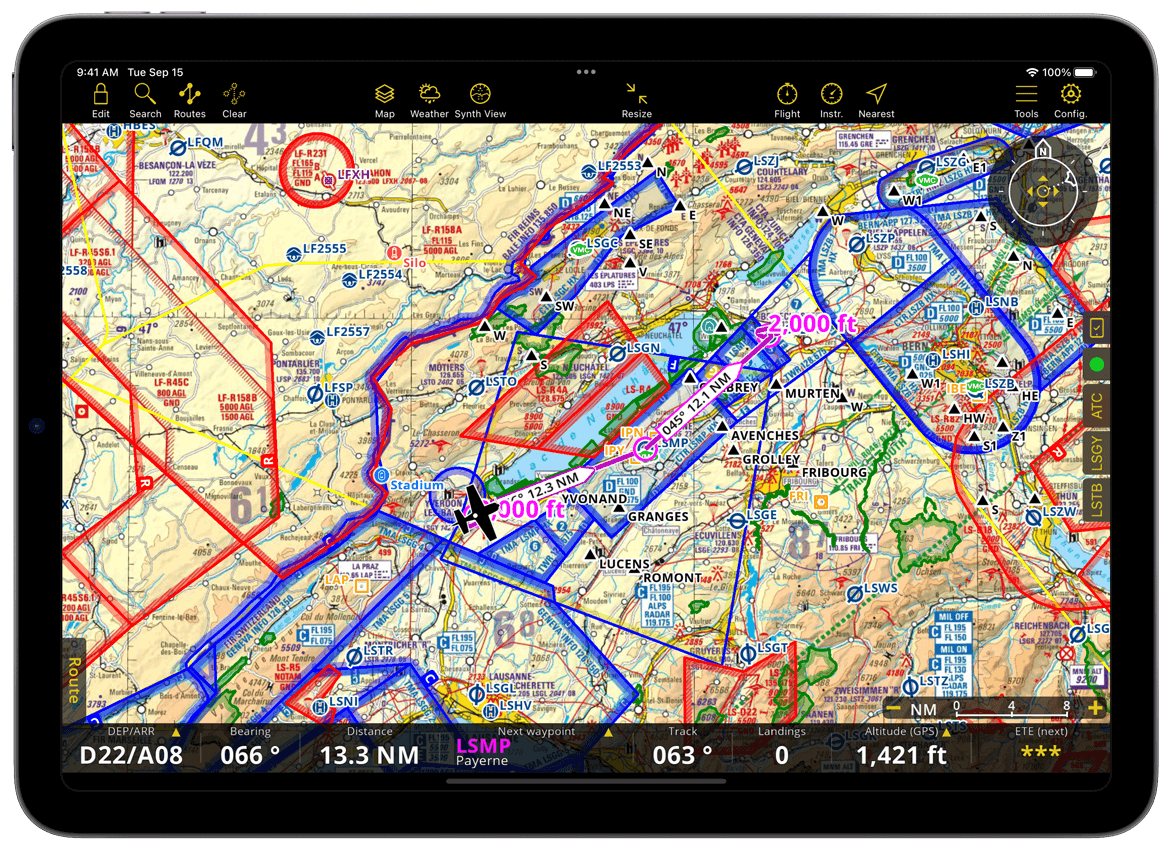
The Moving map is the heart of the application. It is where you spend most of the time interacting with Air Navigation Pro. It displays the necessary information to easily and safely plan your flight and navigate. Once you allow the application to access the device’s GPS, your location is shown on the map.
On the Moving Map you can see the following:
SmartChart (Terrain, cities, roads, landmarks, rivers, lakes)
You can also see other aircrafts when your mobile device is connected to the Internet, to an ADS-B or FLARM Module.
Map Interactions#
You can interact with the moving map by using familiar touch gestures:
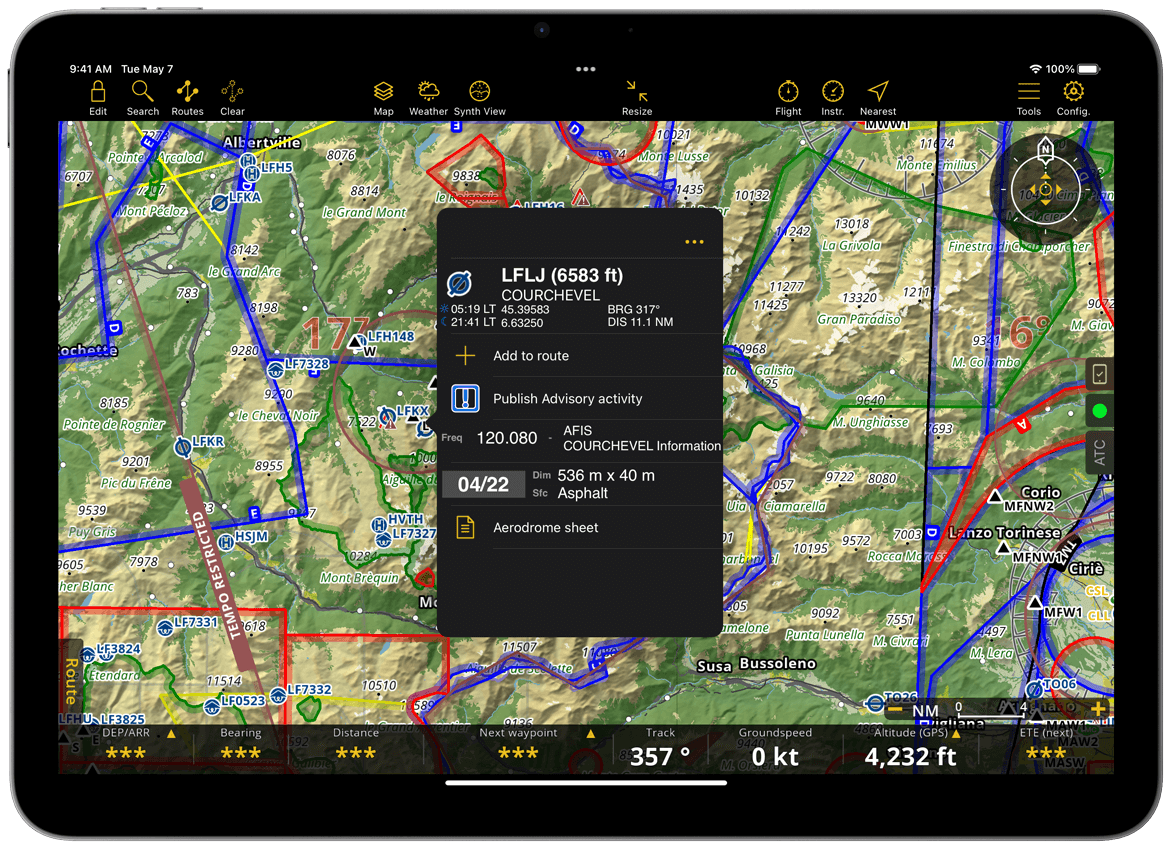
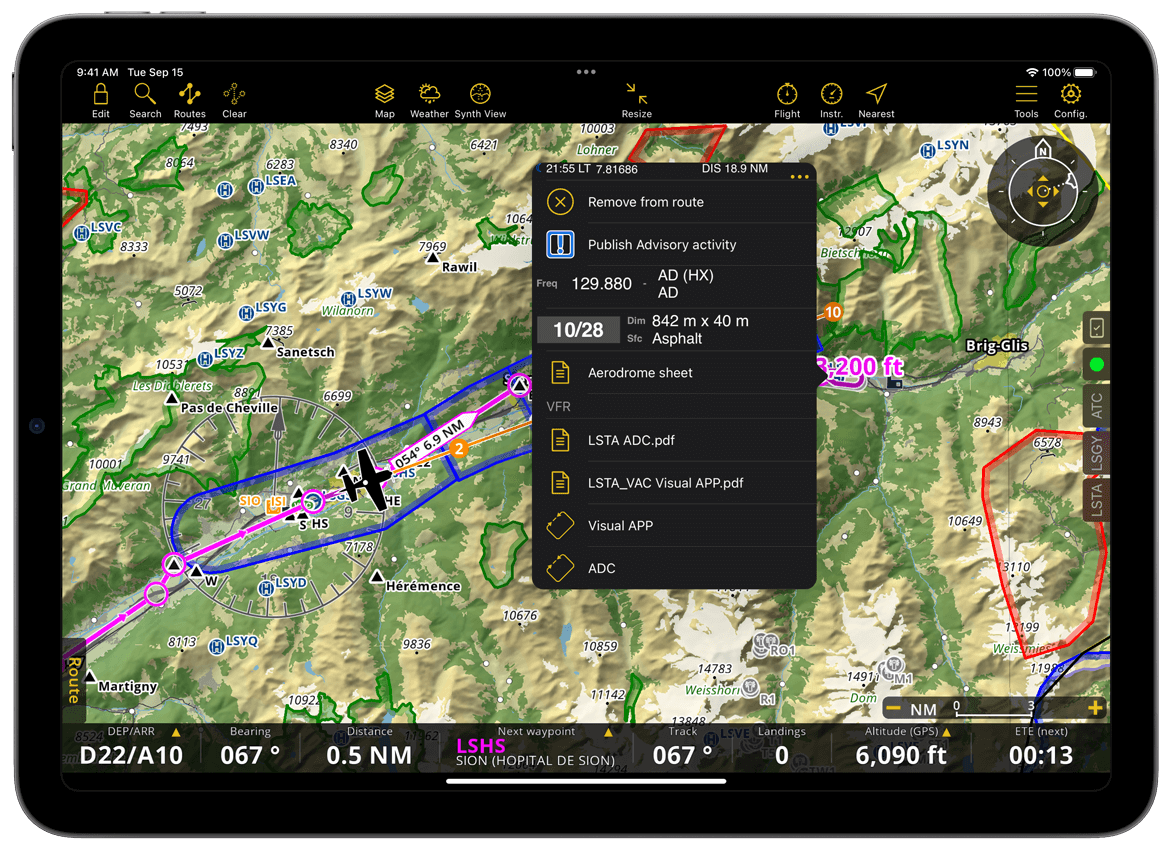
Tap a waypoint, airspace, weather station or NOTAM to reveal detailed information about it
Touch and drag to pan the map
Pinch with two fingers to zoom in/out
Touch with two fingers and rotate to rotate the map
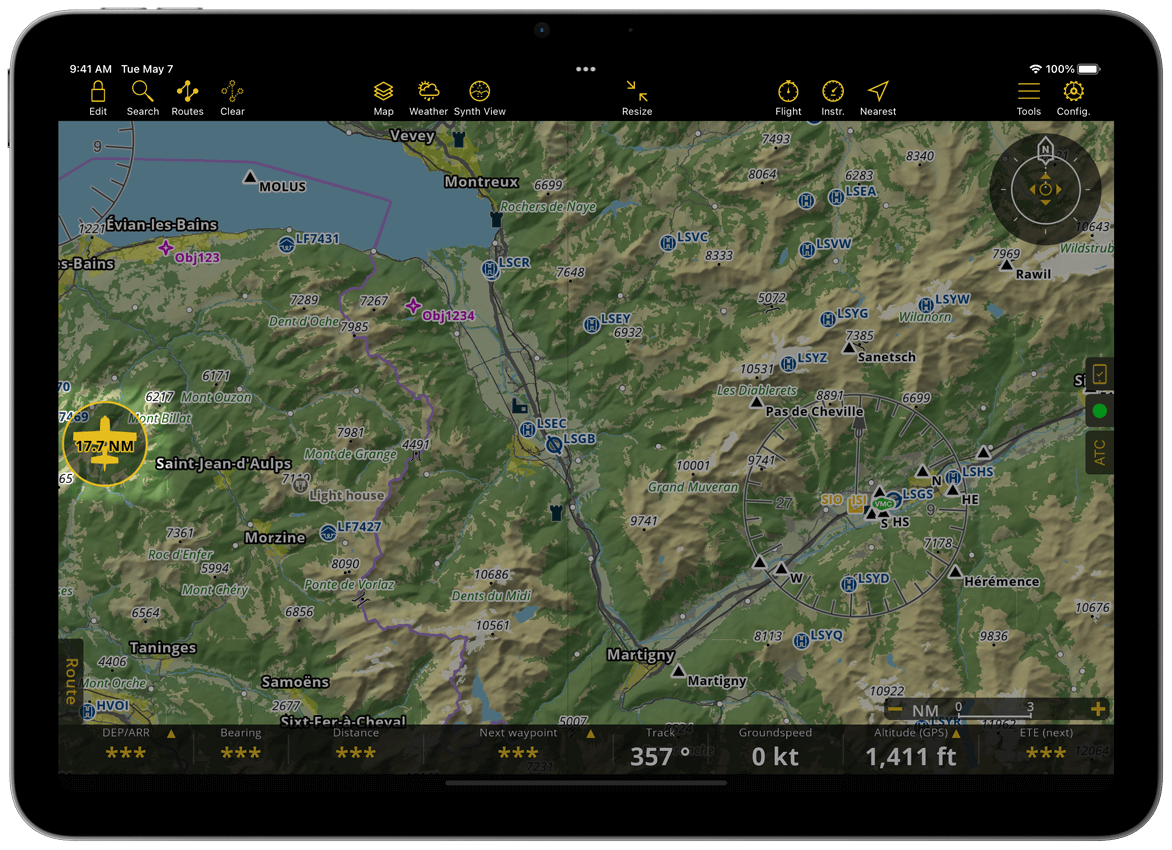
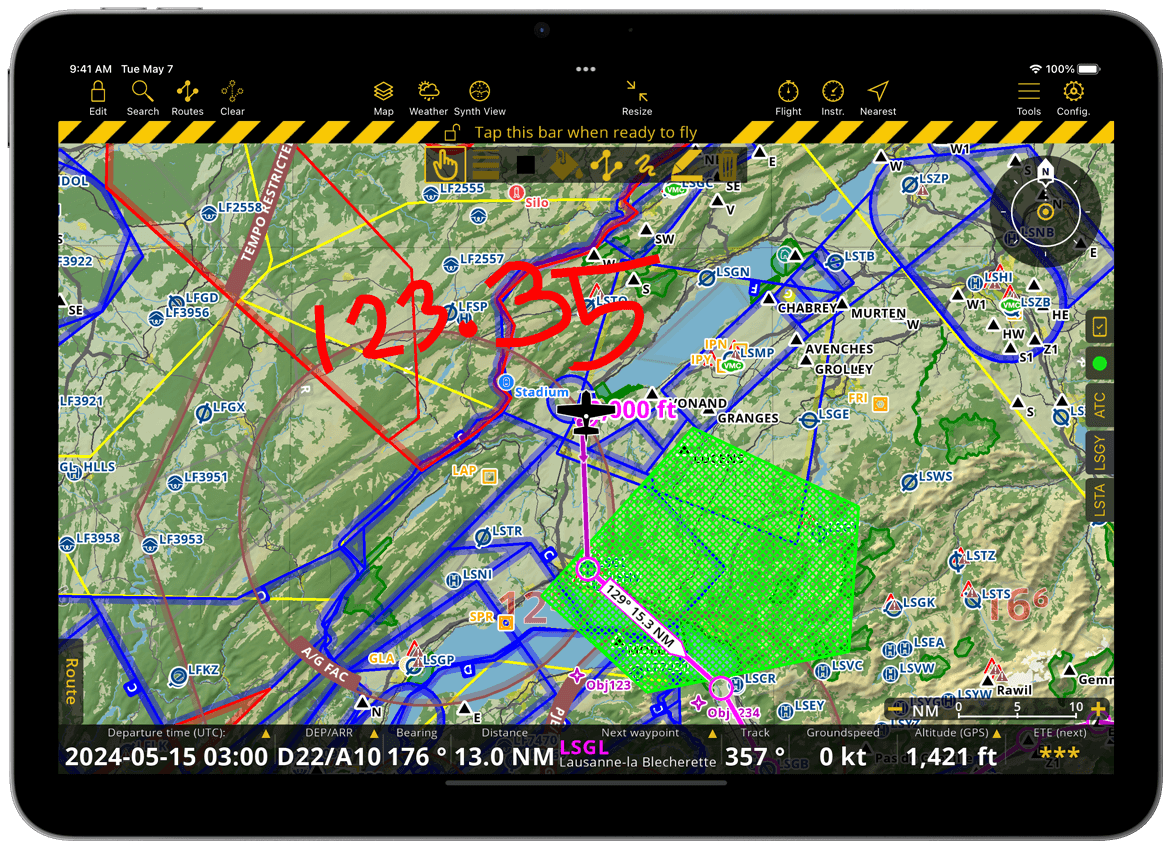
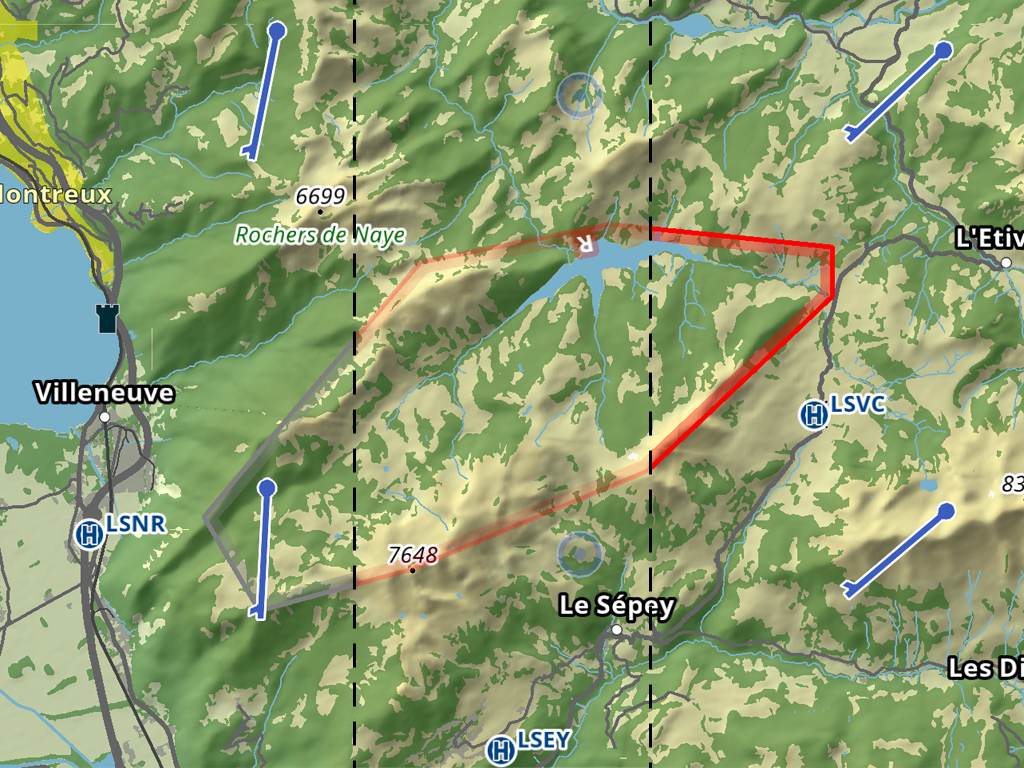
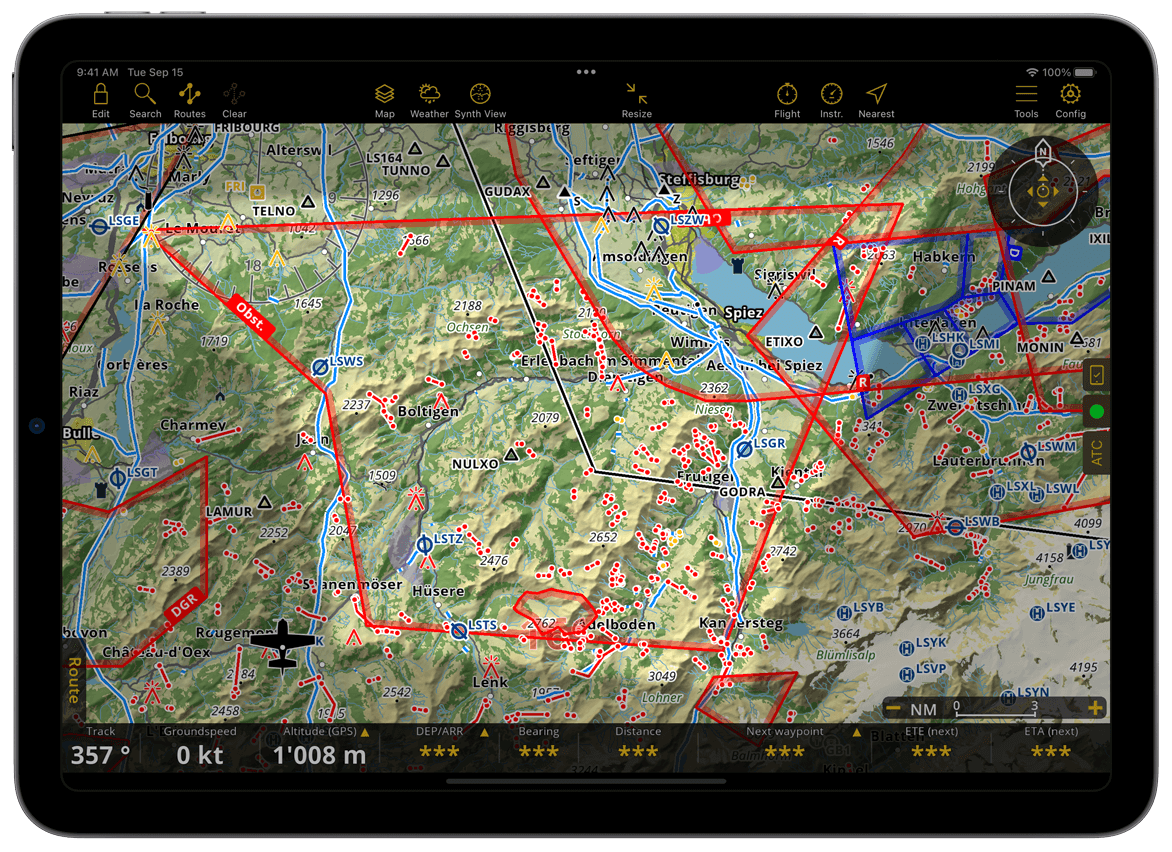
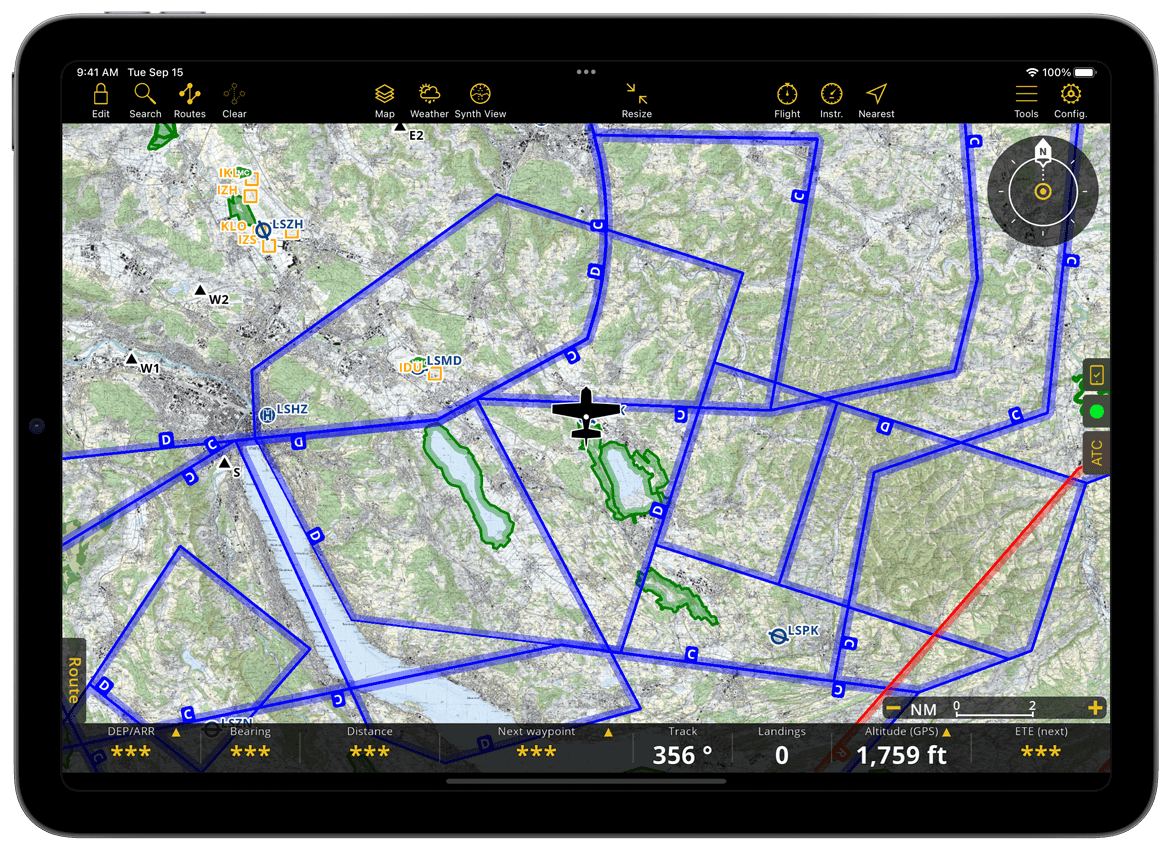
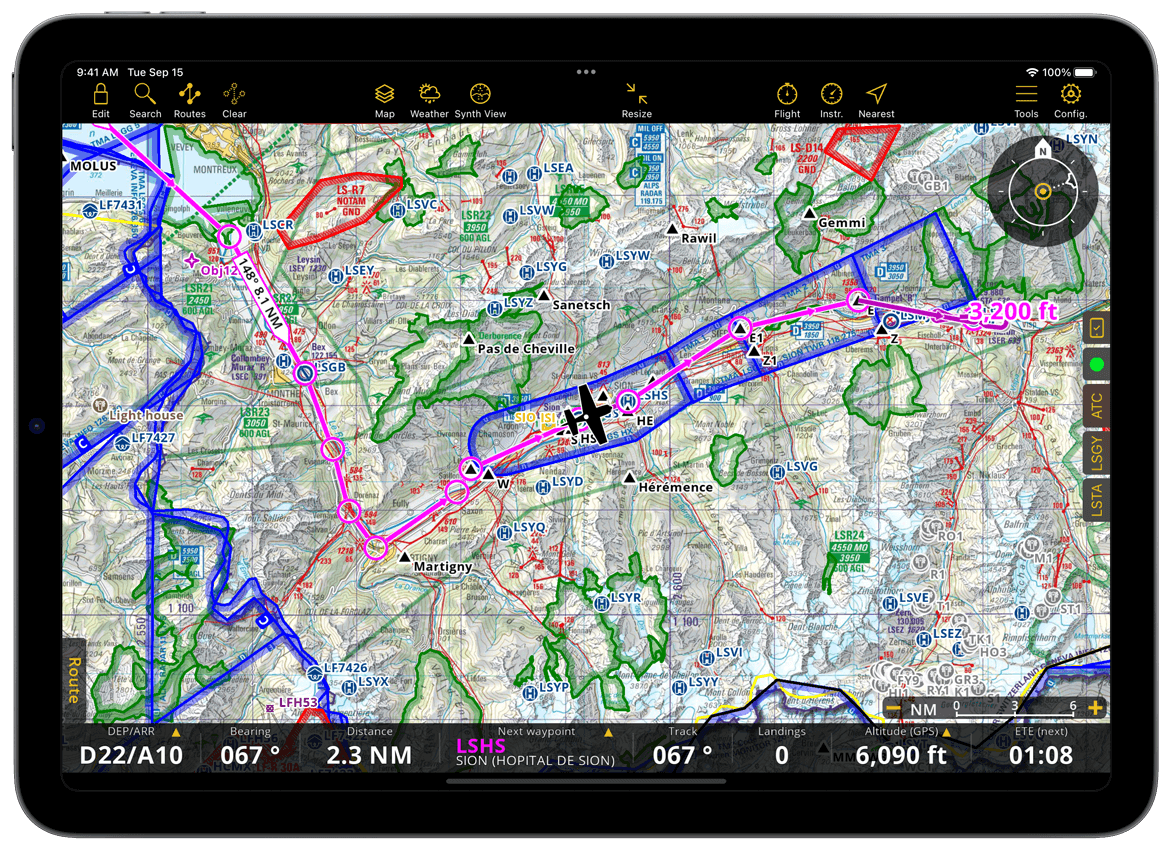
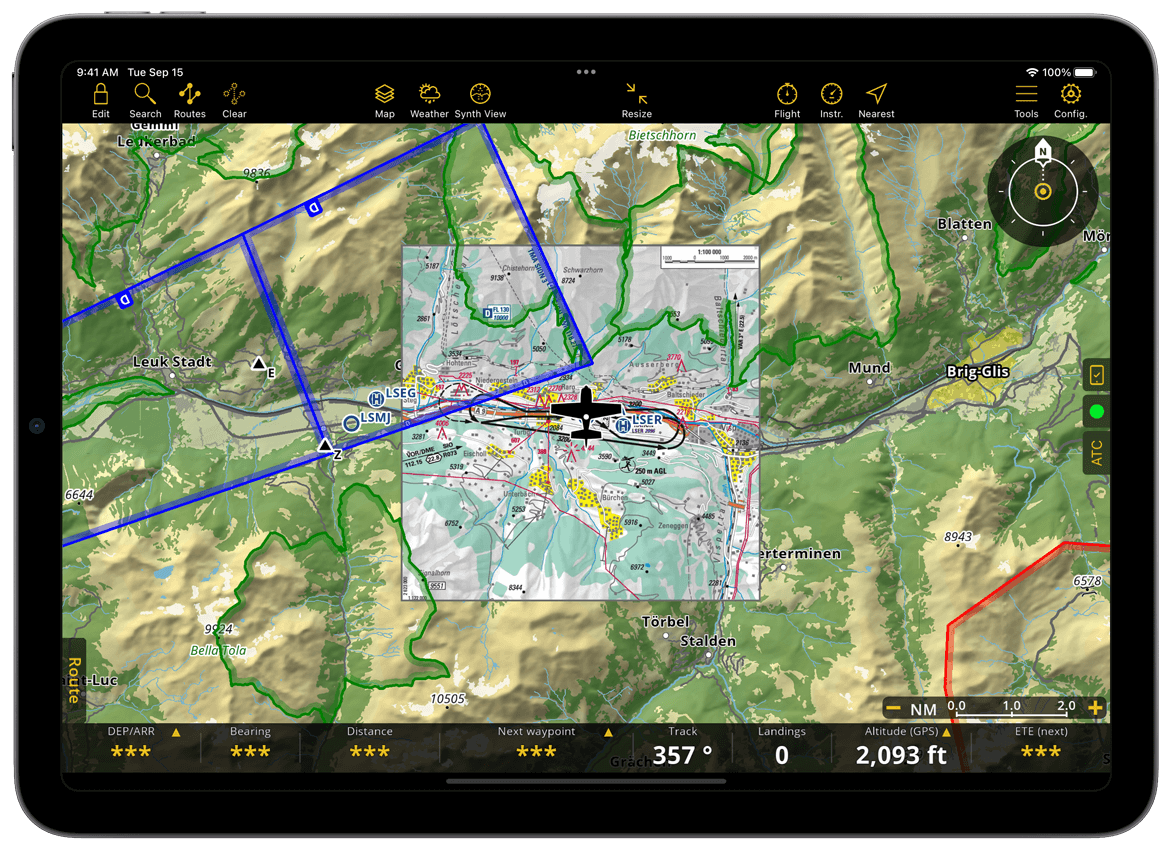
Here is how the moving map with SmartChart looks with an Approach Chart on overlay, a planned route, airspaces and some NOTAMs
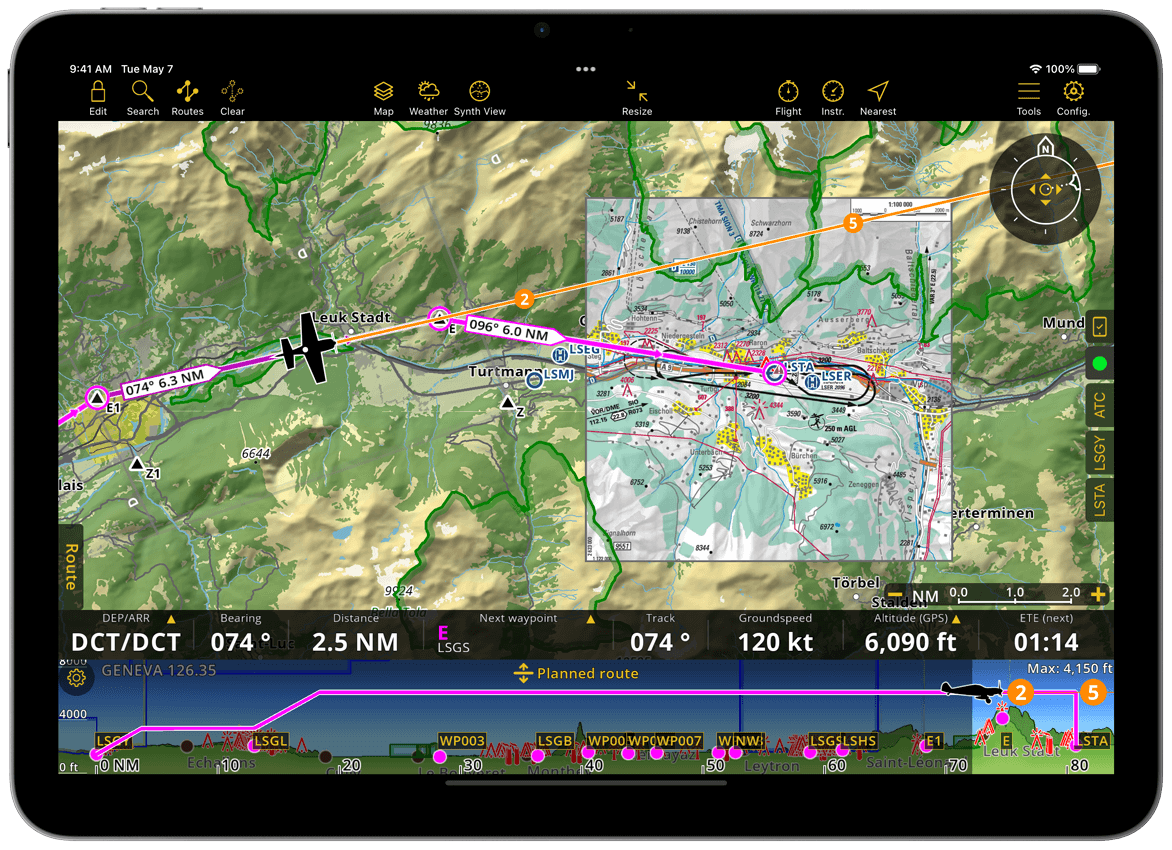
Scaled at 1.5 NM, here is how the moving map with SmartChart looks with an Approach Chart on overlay, a planned route, airspaces and some NOTAMs.
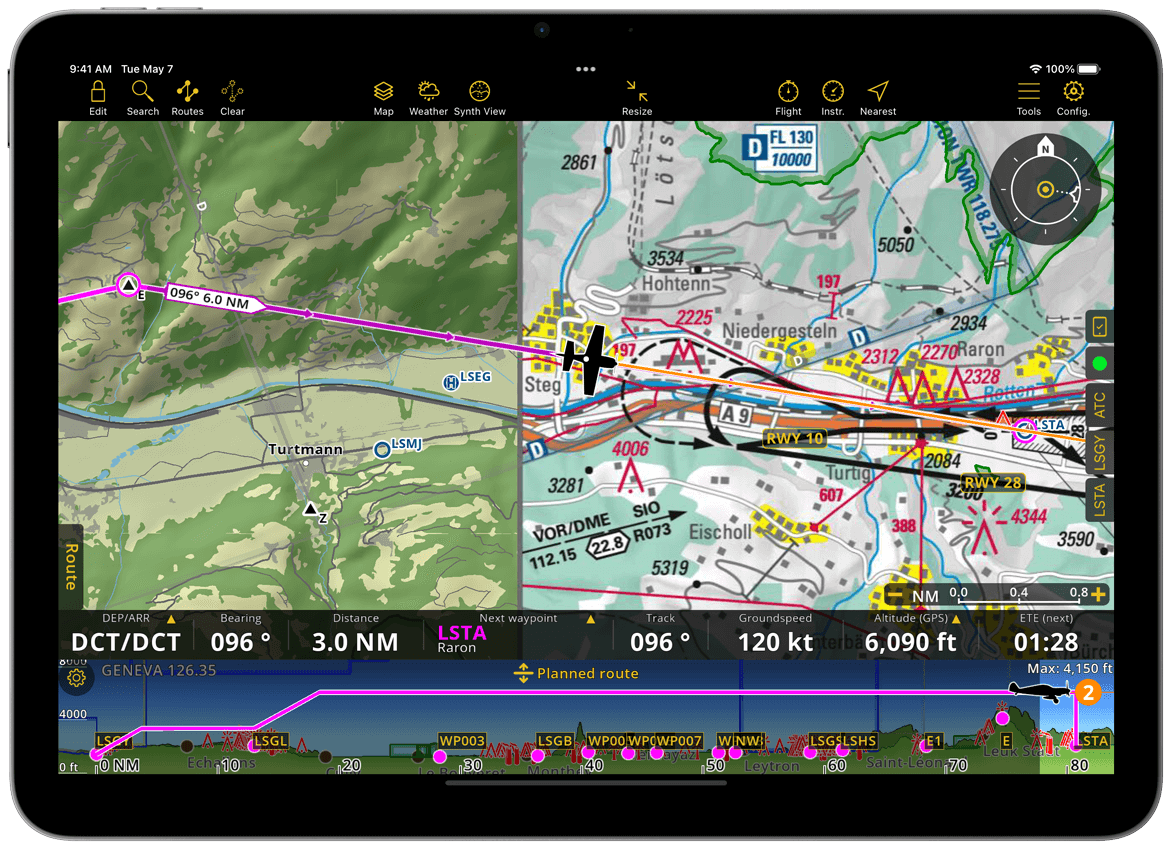
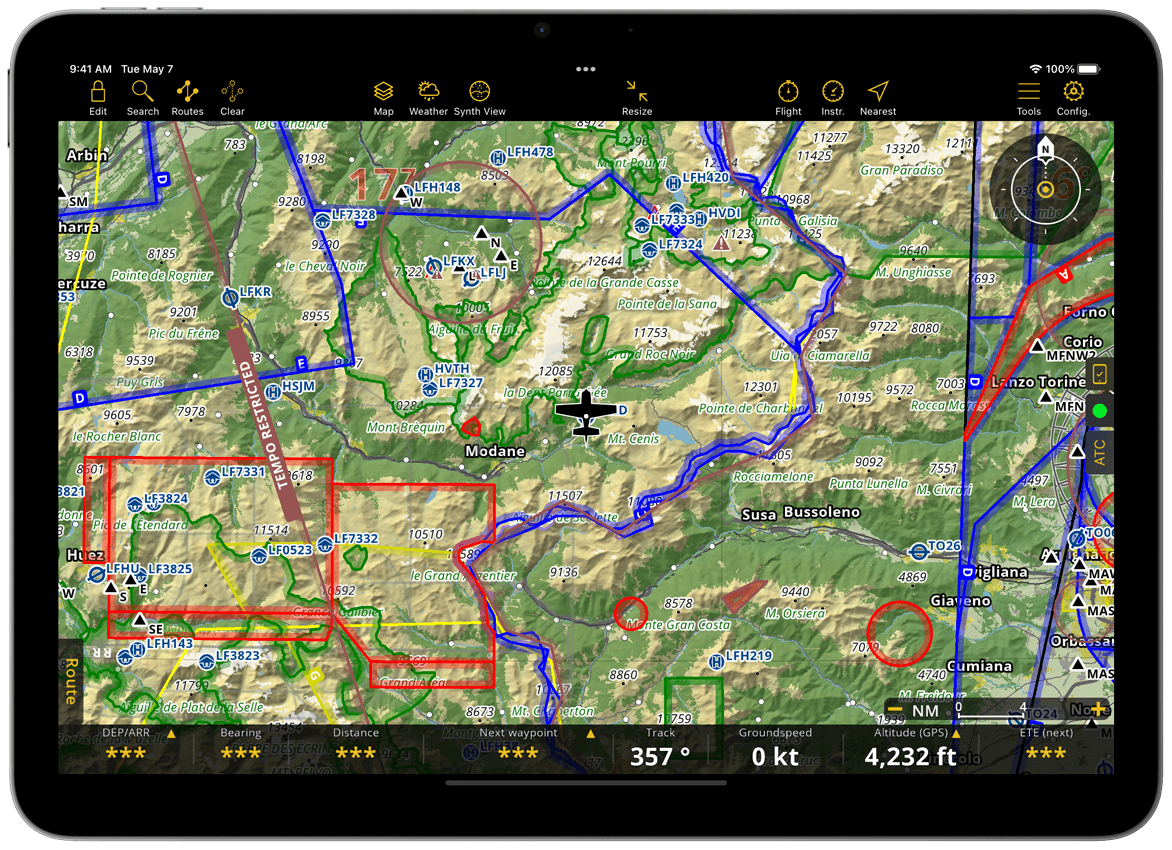
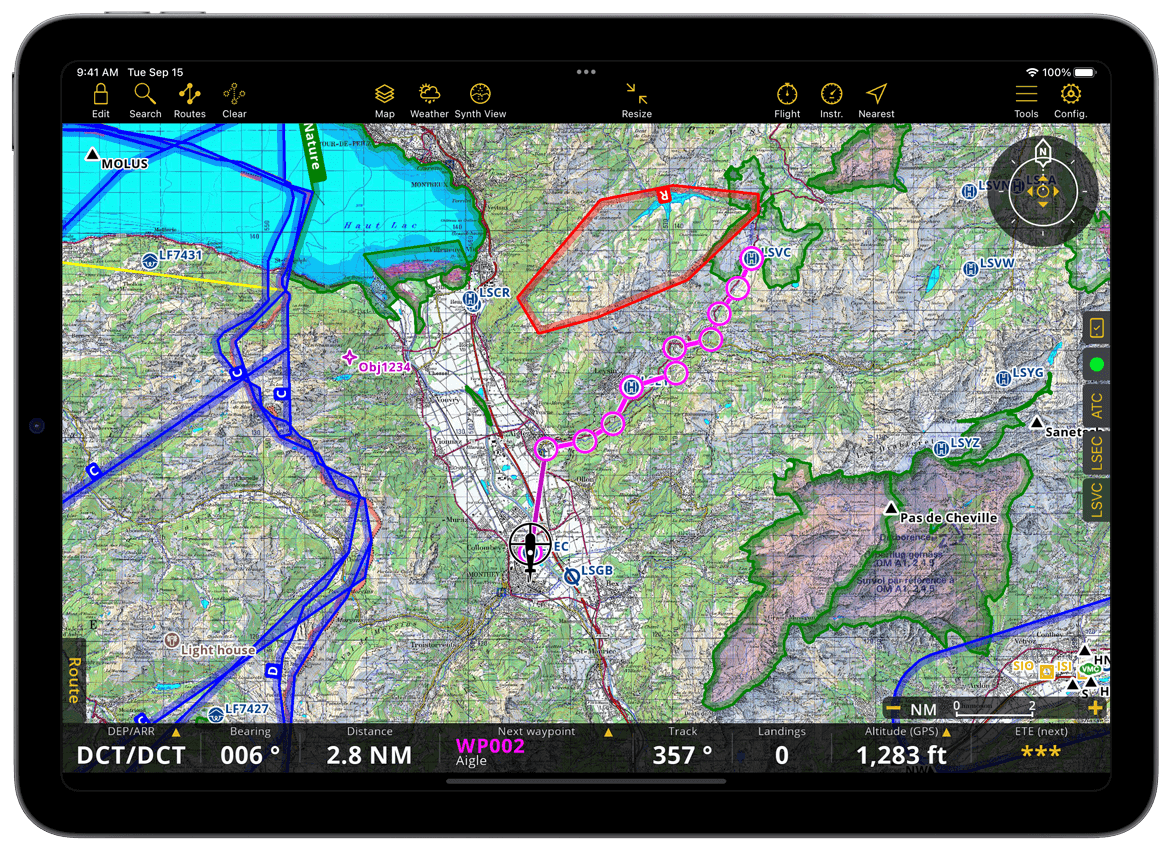
The same moving map with the Approach Chart overlay disabled.

Map Widgets#
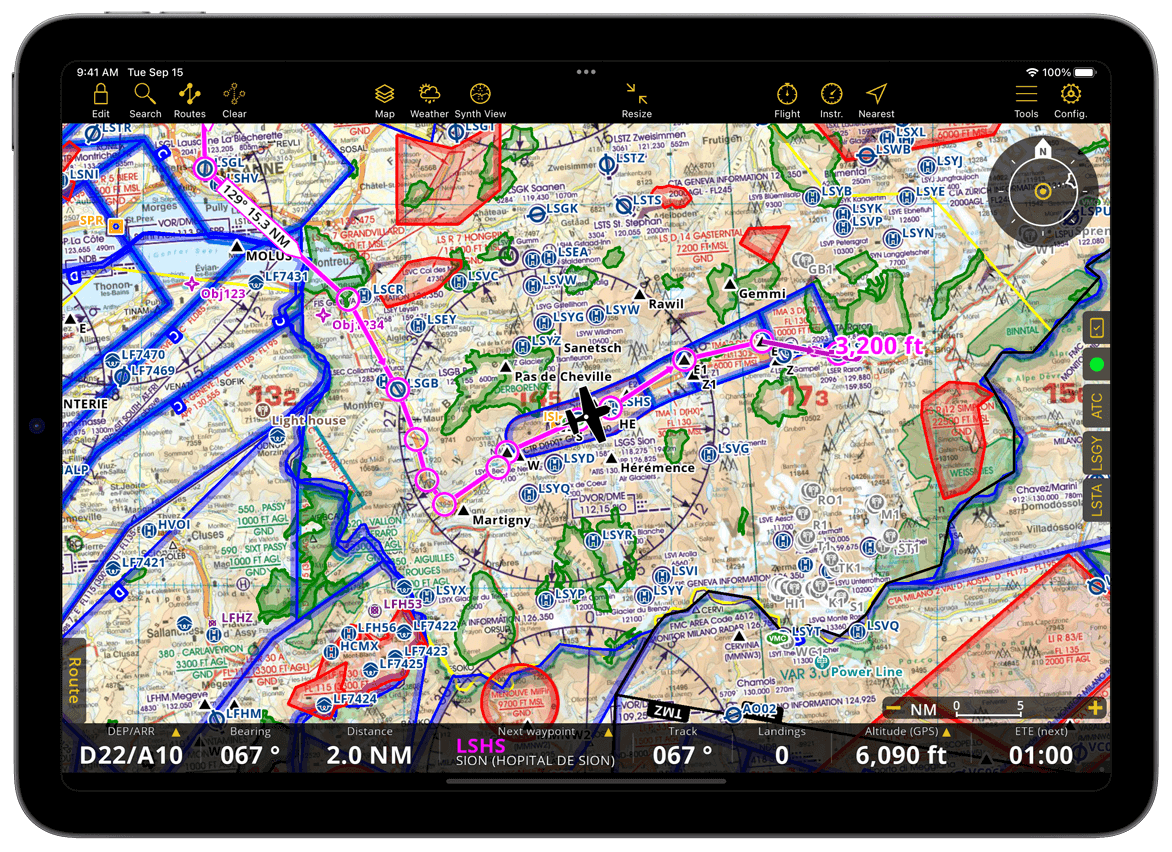
Position indicator#
Your current position is indicated using an icon representing your current aircraft. In case the position is not precise enough, the icon is replaced by a circle centered on the last known position. After a few seconds, the circle is also removed.
Eye altitude#
At the bottom right, the map scale will show you the scope of the current zoom level.
The eye altitude provides you with the range of the displayed map. By default it is shown in NM, you can change this in Config > Settings > Distances & Speed.
Using two fingers you can zoom in/out on the map and the scale measure will change.
You can also use the - and + on the scale bar to zoom in/out.

Compass Rose#
North mode oriented#
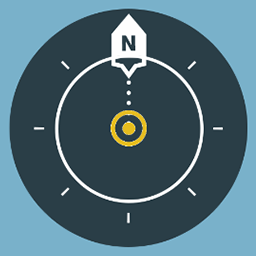
The map is oriented towards the north.
Track mode oriented#
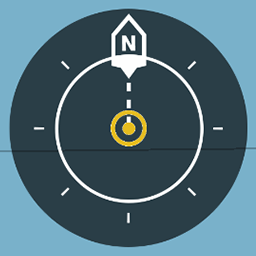
The map is oriented in the direction the aircraft is flying. This is based on the movement on the aircraft, so it won’t be accurate when not moving on the ground.
Panned mode oriented#

Moving the map will switch the compass to panned mode. In this case the map will be moved to the location of your choice, with the orientation of your choice. If your aircraft is outside of the screen, tap the compass once and the map will be centered to your GPS location. Long-pressing on the compass rose will lock the movement of the map.
Interactive Aircraft Position#
When the icon of the aircraft is outside of the screen, your aircraft is displayed in a bubble with distance from its location. Tap on it and the map will get centered on your current position.
Example: The aircraft is outside of the map, on the left side
For more information about what can be done on the Moving Map, please refer to Map options menu.
SmartChart#
SmartChart is a worldwide vector map included in all subscriptions plans. The app generates the map in real time by leveraging topographic and aeronautical data.
The amount of data to represent the earth is huge and cannot be stored entirely on your device. As a result, SmartChart will select and download the most relevant data automatically for offline usage.
For safety reasons, the following data is always available on your device:
Aeronautical database of airspaces and waypoints (worldwide)
Country borders (worldwide)
Mora Grid (worldwide)
Any third-party chart, approach chart and map installed by the user
SmartChart will also automatically install and update terrain, satellite images, landmarks, etc.
around your position
around your current route
All downloaded data is saved within a specific storage limit.
Key benefits of SmartChart:
Guaranteed clarity with the adequate information at every zoom level
Additional information to the raster charts
Rotating shadows for clear distinction of valleys and mountains
Labels remain readable regardless of the chart’s orientation
Dark mode supported
Same design for all countries
Fine tuning
Works perfectly at extreme latitudes
Satellite view
Users can additionally download a specific area around a waypoint or route to make it available offline, find out more in downloads.
Easy to fly thanks to SmartChart#
Thanks to the data being downloaded dynamically, you can instantly view everything in your surroundings and start preparing for your flight.
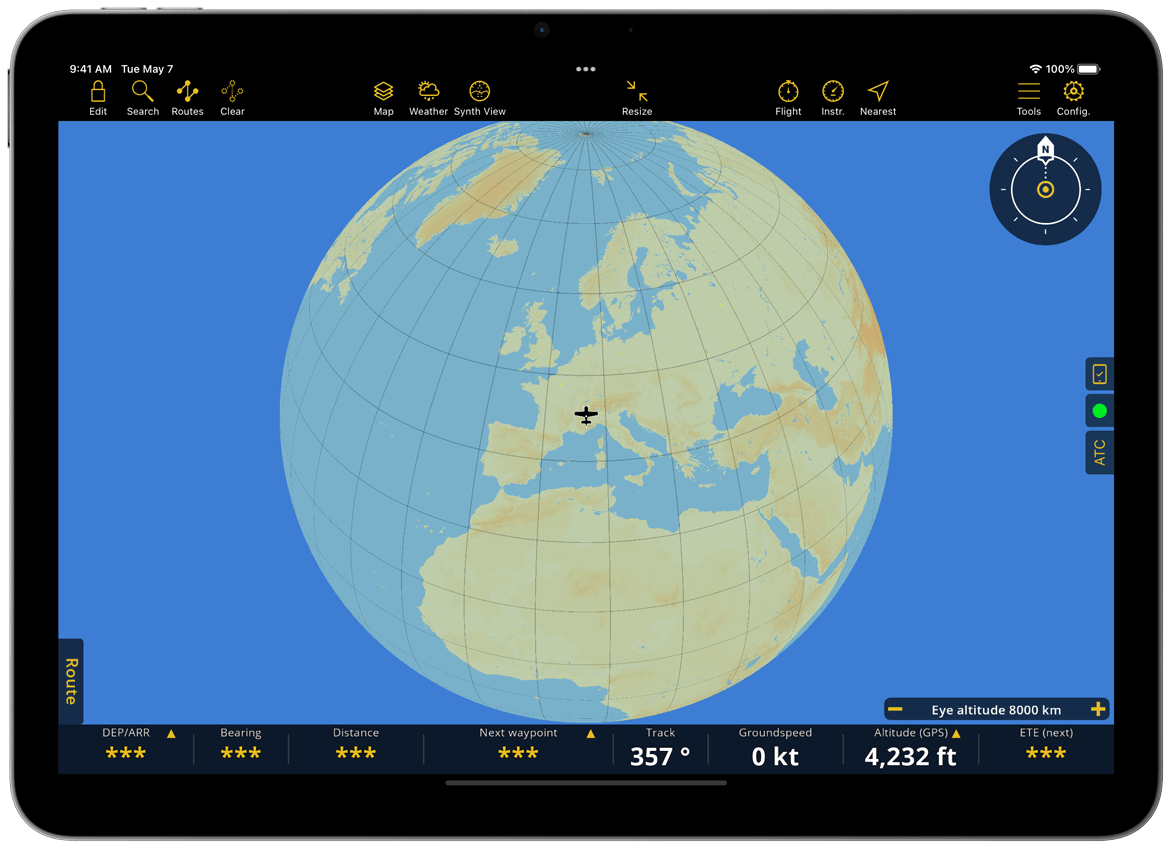
It’s possible to zoom out and see the whole globe, making it easier to jump to a different place.
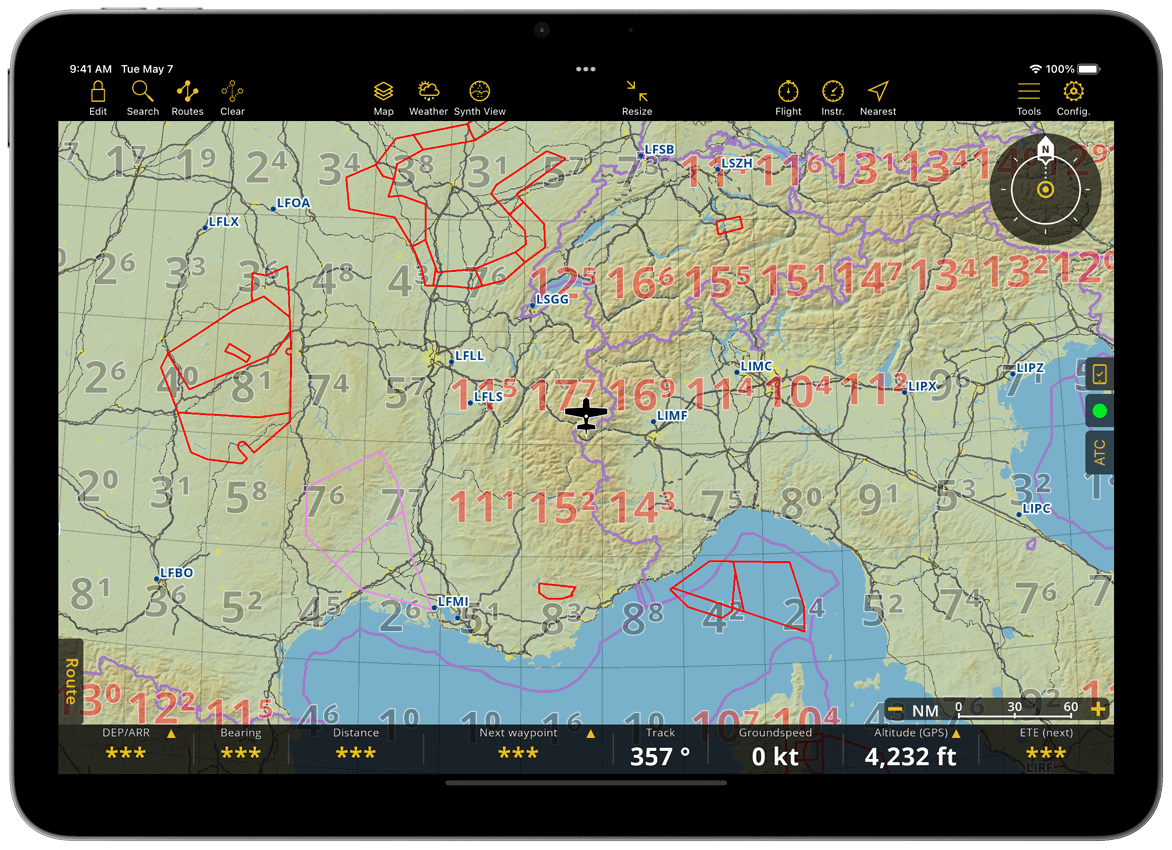
Mora Grid#
It shows on the map the safe altitude of the area to avoid any collisions with the ground and/or obstacles.
VOR Rosas#
VOR Rosas are centered on waypoints and shown as oriented to the North of the chart.

Toponyms#
Natural territories (mountains, rivers, lakes, etc.) and geographical entities (cities) of the country are shown on the map. Toponyms are displayed to help pilots have an easier navigation and awareness of their position.
Land covers#
The base terrain is colored according to land cover: forests, cities, swamps.
Map Annotations#
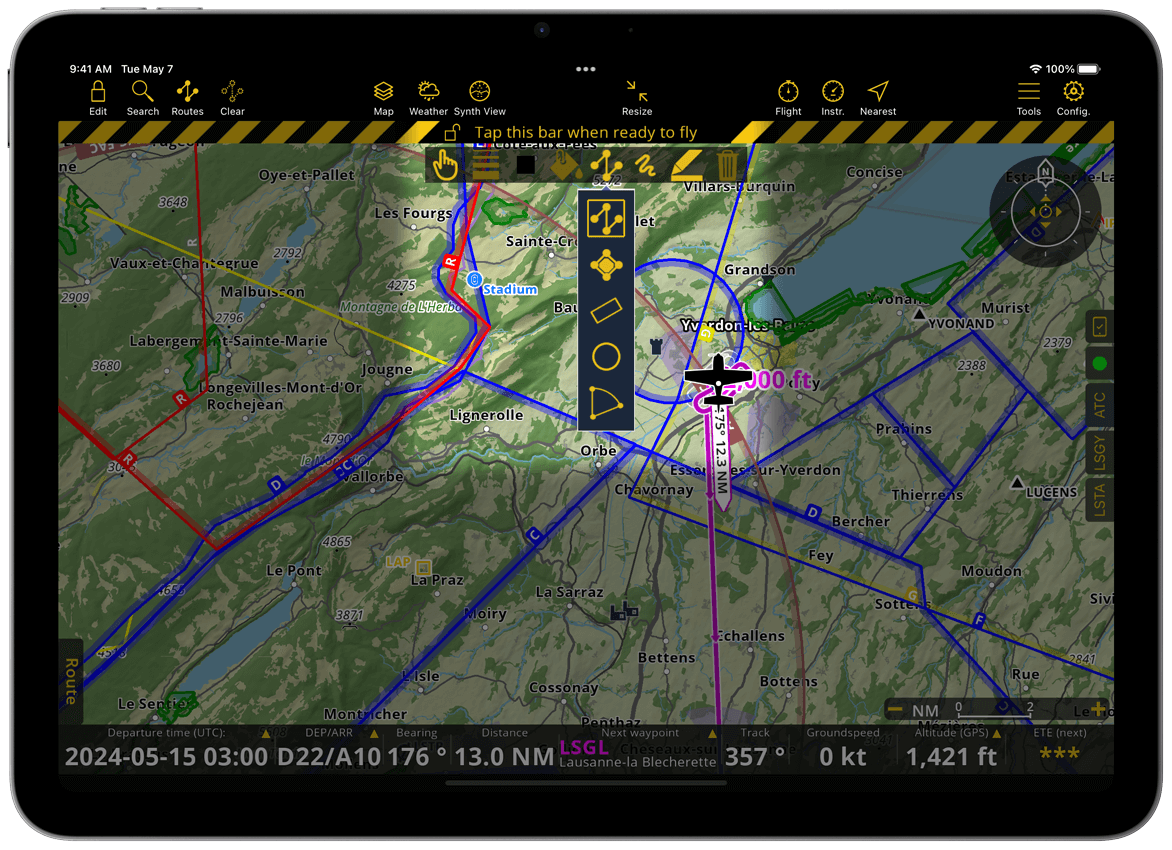
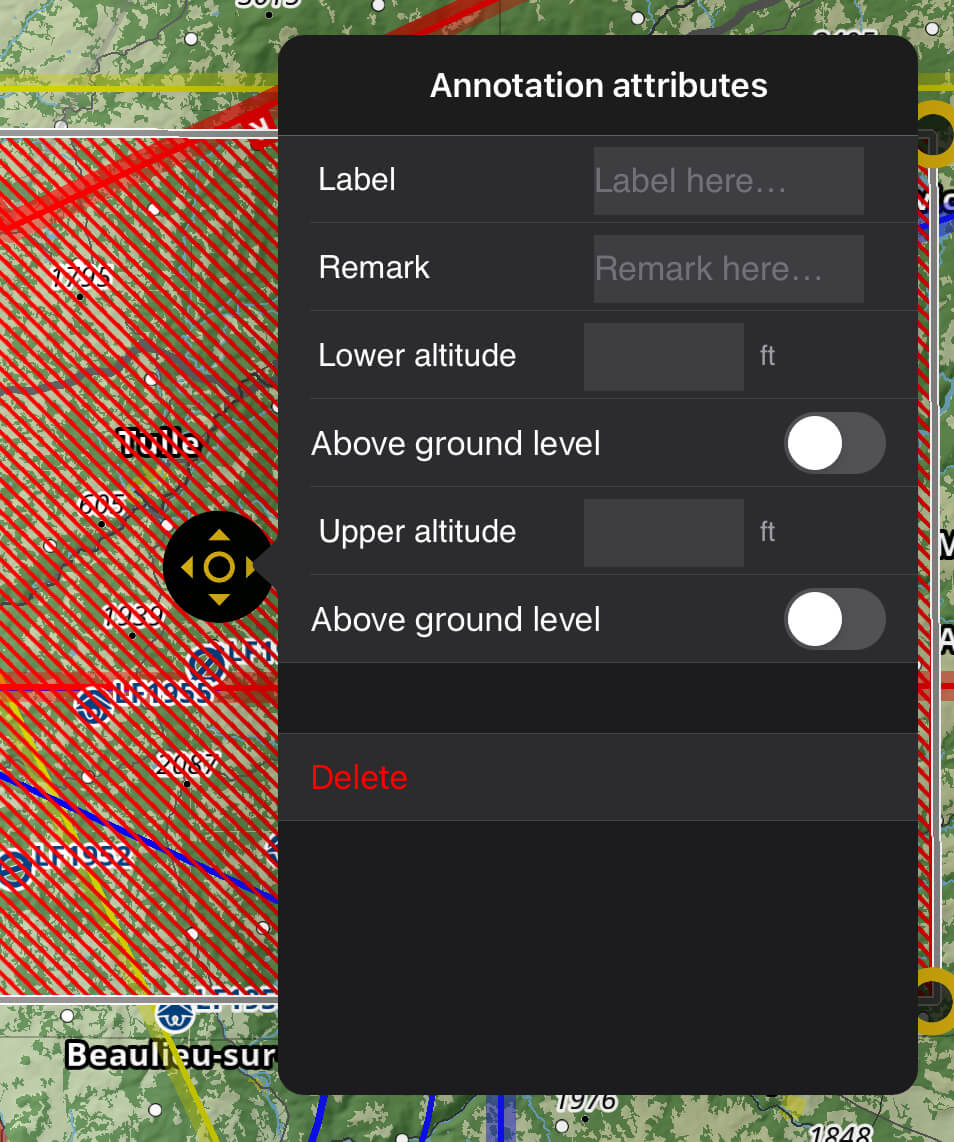
You can add useful information to the Moving Map using map annotations. With this feature, you can highlight, draw geometrical shapes and write with a marker, customizing the color, line thickness and fill pattern. You can also assign attributes to annotations such as labels and remarks and define lower and upper altitudes, allowing you to create your own aeronautical data.
Activate map annotations by toggling ON the related option in Map Options > Guides. An additional toolbar will appear on the Moving Map below the yellow and black striped under-construction bar of the Edit Mode.
Annotation Toolbar#
The action buttons arranged from left to right are:
Select: Allows you to select, move, resize, change color and line thickness of existing annotations
Line: Allows you to choose the line/outline thickness for annotations supporting it
Color: Allows you to choose the outline and fill color for geometrical annotations
Note
Solid color fills will have some transparency to ensure you can still see the map below the annotation
Fill: Allows you to give geometric shapes a fill option: solid color, no fill or two pattern types
Shape: Allows you to create lines or geometric shapes by selecting an options: polyline, polygon, rectangle, circle and sector. Once the shape is selected, tap on the map to start creating it.
Free draw: Allows you to draw and write on the map with your finger
Highlighter: Allows you to highlight a map area with a bright color
Delete: Allows you to delete a selected annotation
After creating an annotation, select it and tap on the black center icon to open the attributes window.
Annotations will remain displayed on the Moving Map until you delete them or disable the feature on Map Options > Guides. You can find the list of all your annotations on Tools > KML files & Map annotations. Tap on any annotation of the list to see it centered on the map. You can delete individual annotations by sliding it to the left or delete them all together using the ![]() icon in the top right corner.
icon in the top right corner.
You can also display map annotations on the Profile View.
Waypoints#
Introduction#
You need to have an active subscription to access the waypoints database. It is updated at each AIRAC cycle, i.e. every 28 days. You can see Map options menu all the type of Waypoints that we offer.
Air Navigation Pro has over 210,000 waypoints worldwide displayed on the map. These waypoints can be easily searched and added to your route, and you can import additional waypoints yourself. By tapping on them, information is revealed. We also provide an easy way of creating your own waypoint just by a few steps!
Waypoint Search#
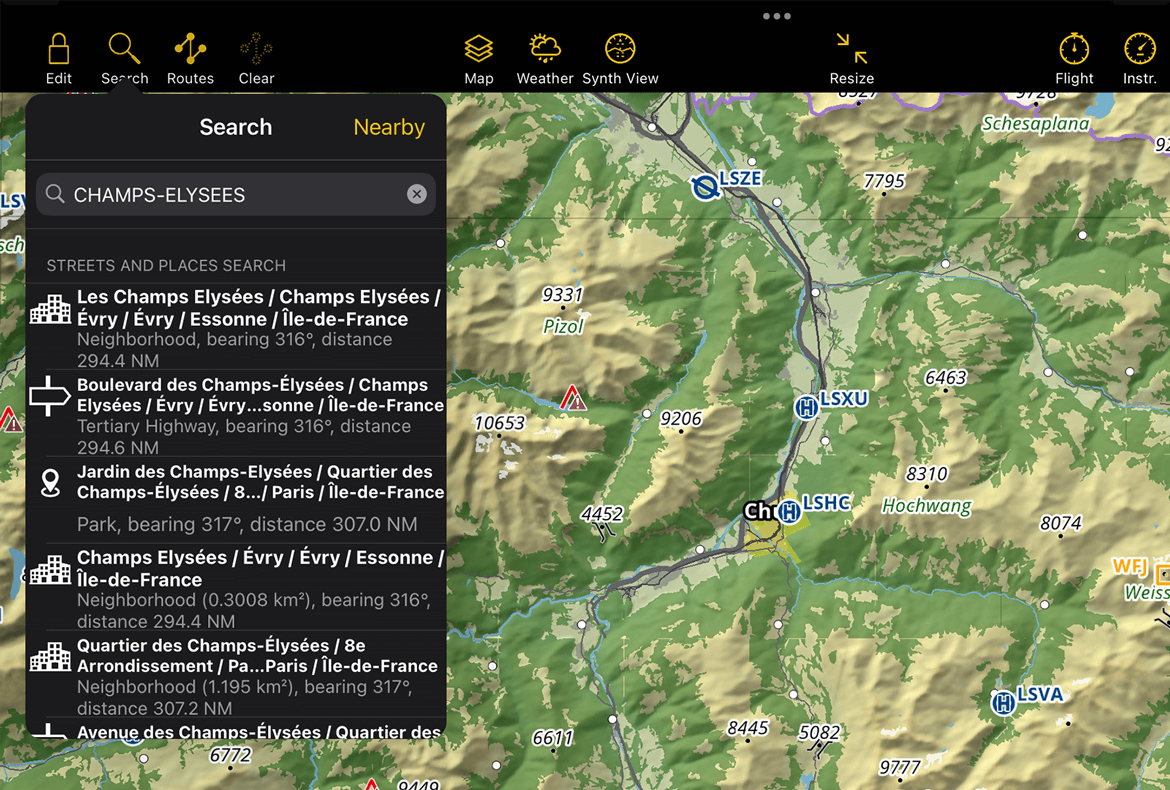
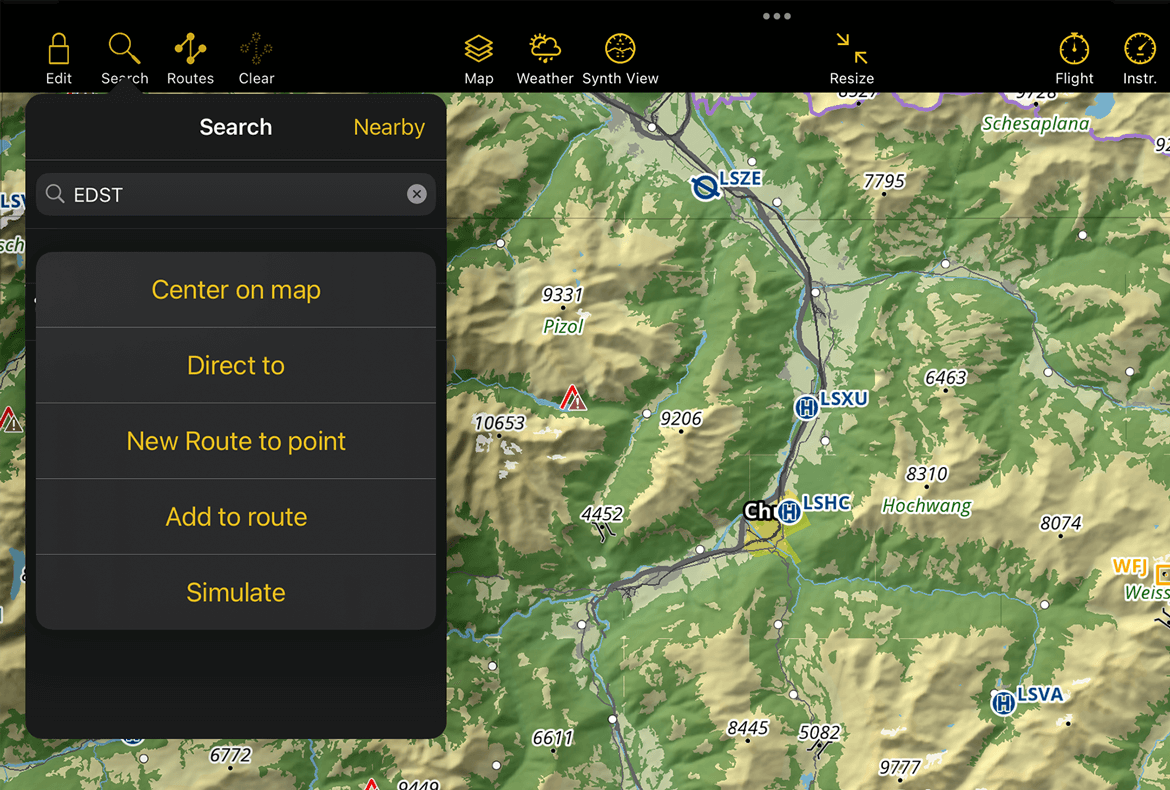
Access the quick search from the Menu bar > Search. Type an identifier, name, or coordinates to instantly see matching objects like waypoints. Tap a result to view details, center the map, and more.
Search by Identifier#
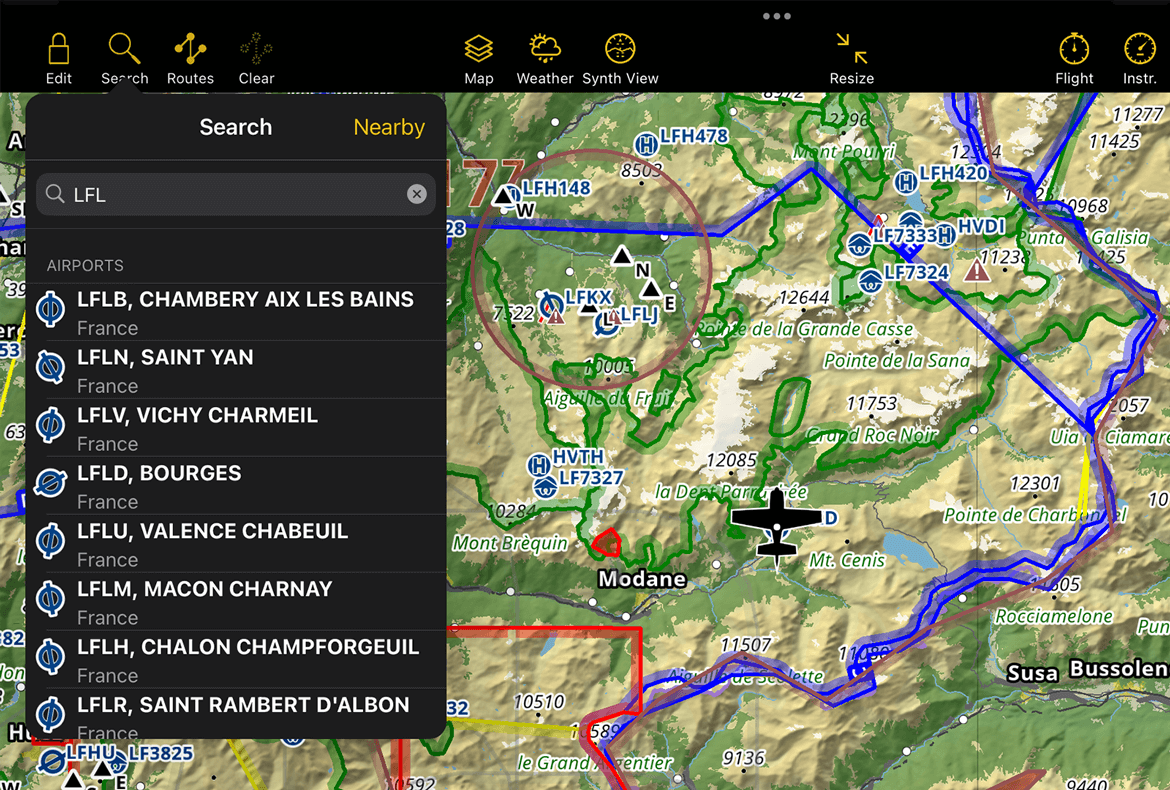
By inputting at least 1 character on the search bar, the search results will appear for text matching:
Waypoint Identifiers (ICAO Codes, etc) including user created waypoints
Waypoint names including user created waypoints
Document names associated with a waypoint The results are grouped in lists.
Note
The search results will appear in alphabetical order as follows: 1. User waypoints, 2. Airports, 3. NAVAIDs, 4. Other waypoints, and other objects, such as NOTAM.
Search by Coordinates#
You can enter coordinates in the following formats/grids/datums:
WGS84 in DD:MM:SS |
Irish grid without zone |
WGS84 in DD:MM.decimal |
Irish grid with zone |
WGS84 in DD.decimal |
NZ Grid 1949 |
Standard UTM |
NZ Grid 2000 |
UTM with bands |
Swissgrid (CH1903) |
UPS |
UK Grid without zone |
MGRS 100m |
UK Grid with zone |
MGRS 10m |
Swedish grid RT90 |
MGRS 1m |
Swedish grid SWERED99TM |
The search feature will try to interpret the input to match the correct datum. In order to avoid ambiguity between grids it is necessary to enter the 2-letter code of the target country: Irish grids: IE, New Zealand grids: NZ, Swiss grid: CH, UK grids: UK, Swedish grids: SE.
EXAMPLES:
Formats/grids/datums |
Entered value |
WGS84 in DD.decimal |
44.8943 5.4535 |
WGS84 in DD:MM:SS |
23:34:56N 145:12:01W |
Swissgrid |
CH 553986 200005 |
Swedish grid |
SE 6669189 486557 |
MGRS |
32TKR6770698424 |
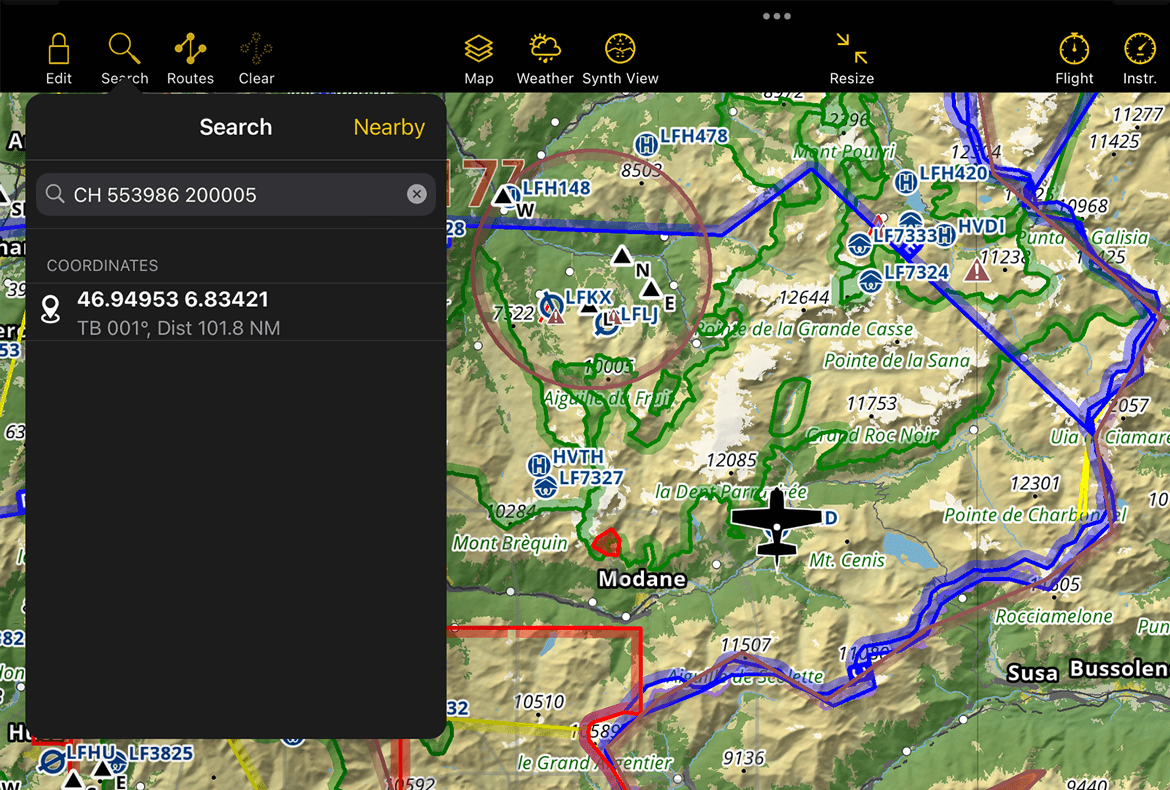
If a valid coordinate has been entered, the result will appear on the first line of the search result. The results will be prioritized based on the objects closest to your current location.
A true bearing and distance from the current GPS location will be displayed as well. This is not a waypoint result from the database but a location. You can use it to create a Direct to, Add to your route or even create a new User waypoint at this location.
Searching relative waypoints#
By using similar syntax as when looking for coordinates and adding commands, it is possible to create waypoints relative to a known location. 3 modes are available:
Location, Radial/Bearing, Distance
Location, Radial/Bearing, Speed, Time
Location, Radial/Bearing, Location, Radial
Note
Components must be separated by a comma.
Location: can be either a coordinate or a waypoint identifier
Direction: can be true bearing or radial.
True bearing will be an angle from 0 to 360 and prefixed with a B, e.g. B055.
Radial will be treated as a magnetic bearing and will be an angle from 0 to 360, prefixed with an R, e.g. R220. It will be converted to true by using the current magnetic variation model.
Distance: a value in nautical miles prefixed with a D. An optional suffix will allow using other units. Example: D120KM. Supported units:
SM (Statute miles)
KM (Kilometers)
M (meters)
Speed: a value in knots prefixed with an S or GS. An optional suffix will allow using other units. Example: S100KMH. Supported units:
MPH (statue miles per hour)
KMH (kilometer per hour)
MPS (meters per second)
Note
Using S will account for the wind to compute the distance (if weather data is available)
Time: can be a relative in minutes or an absolute time in HH:MM UTC, prefixed with T or AT for absolute. Example: AT08:21
Now let’s see some examples on how to search a waypoint:
Location, Direction, Distance
Creating a waypoint knowing a radial and DME to a navigation aid. For this we need to enter the following information: Location of the navigation aid (ICAO Code or Coordinates), radial and distance to the aid (in Nautical miles, Statute miles, Kilometers or meters).
Let’s say I want to create a point that is on radial 275 of the VOR of Geneva (GVA) at 25NM. I will enter the following in the tool: GVA, R275, D25

Alternatively, you can enter the coordinates of GVA: 46:15:12 N 06:08:14 E, R275, D25
If you want to use true bearing instead of radial just change the R for a B.
To change the distance unit just add SM for statute mile, KM for Kilometer or M for meter at the end of Distance. Example: GVA, B275, D25KM
Location, Direction, Speed, Time
Let’s say you are flying and you are requested by ATC to report your position 5 minutes after passing over GVA. You are flying at 108 knots GS and you are on the radial 275 of GVA. You can enter this String and the tool will search for that point: GVA, R275, S108, T5
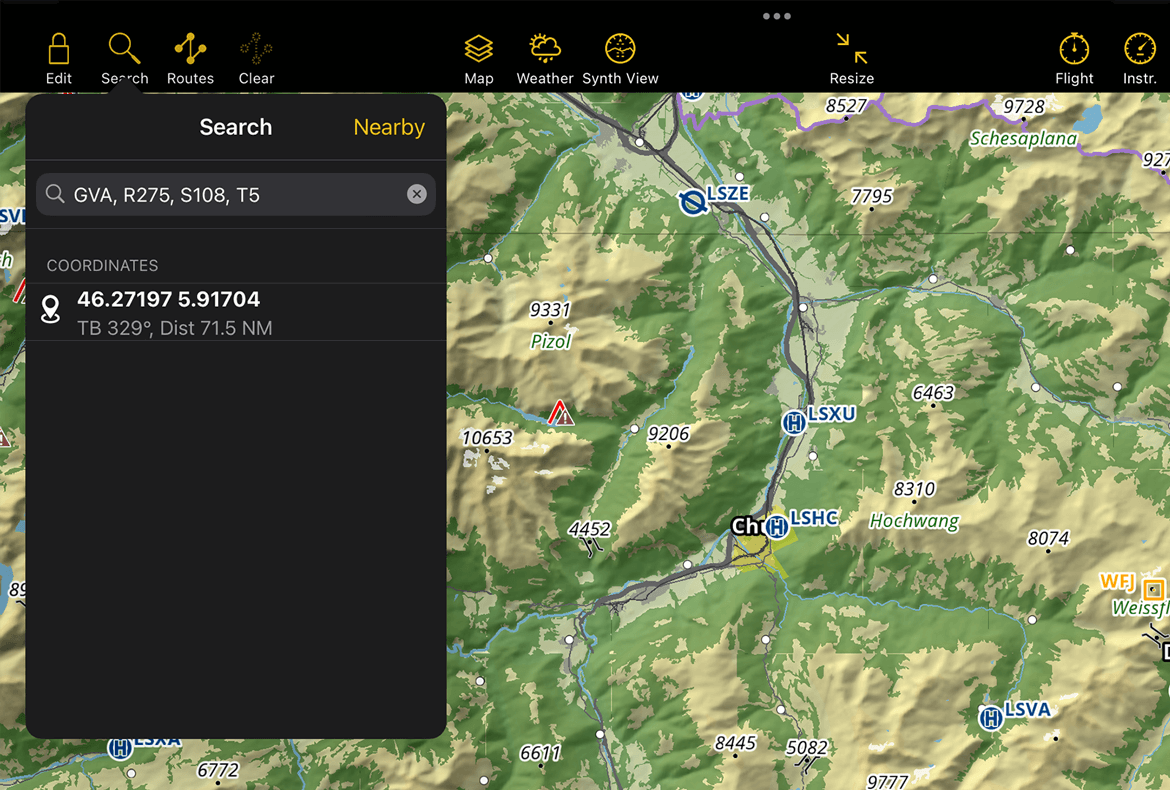
You can also enter a specific time in UTC. Use the Code AT before the time for this: GVA, R275, S108, AT12:58
You can also enter the speed in statute miles per hour, kilometers per hour and meters per second. Enter just MPH, KMH or MPS after the speed.
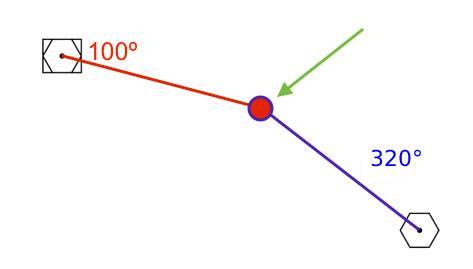
Location, Direction, Location, Direction
Creating a waypoint knowing the radials of two navigation aids.
You can create a point easily by entering the following information:
Navigation Aid 1, Radial 1, Navigation Aid 2, Radial 2. GVA, R100 , SCS, R320
Of course you can use coordinates or bearings for the above command.
Search by geocoded places#
It is also possible to search by the name of a locality, street, landmarks, etc.
First you need to acquire and install our product ‘Streets and places search’. Once installed, you will be able to search for places like hospitals, streets, and many other points of interest. You can use these points as regular waypoints by adding them to routes or showing them on the map.
Search by Postal Code#
You can now easily search for postal codes, allowing you to find specific areas by entering a postal code. Currently available only for the United Kingdom, with support for more countries coming soon.
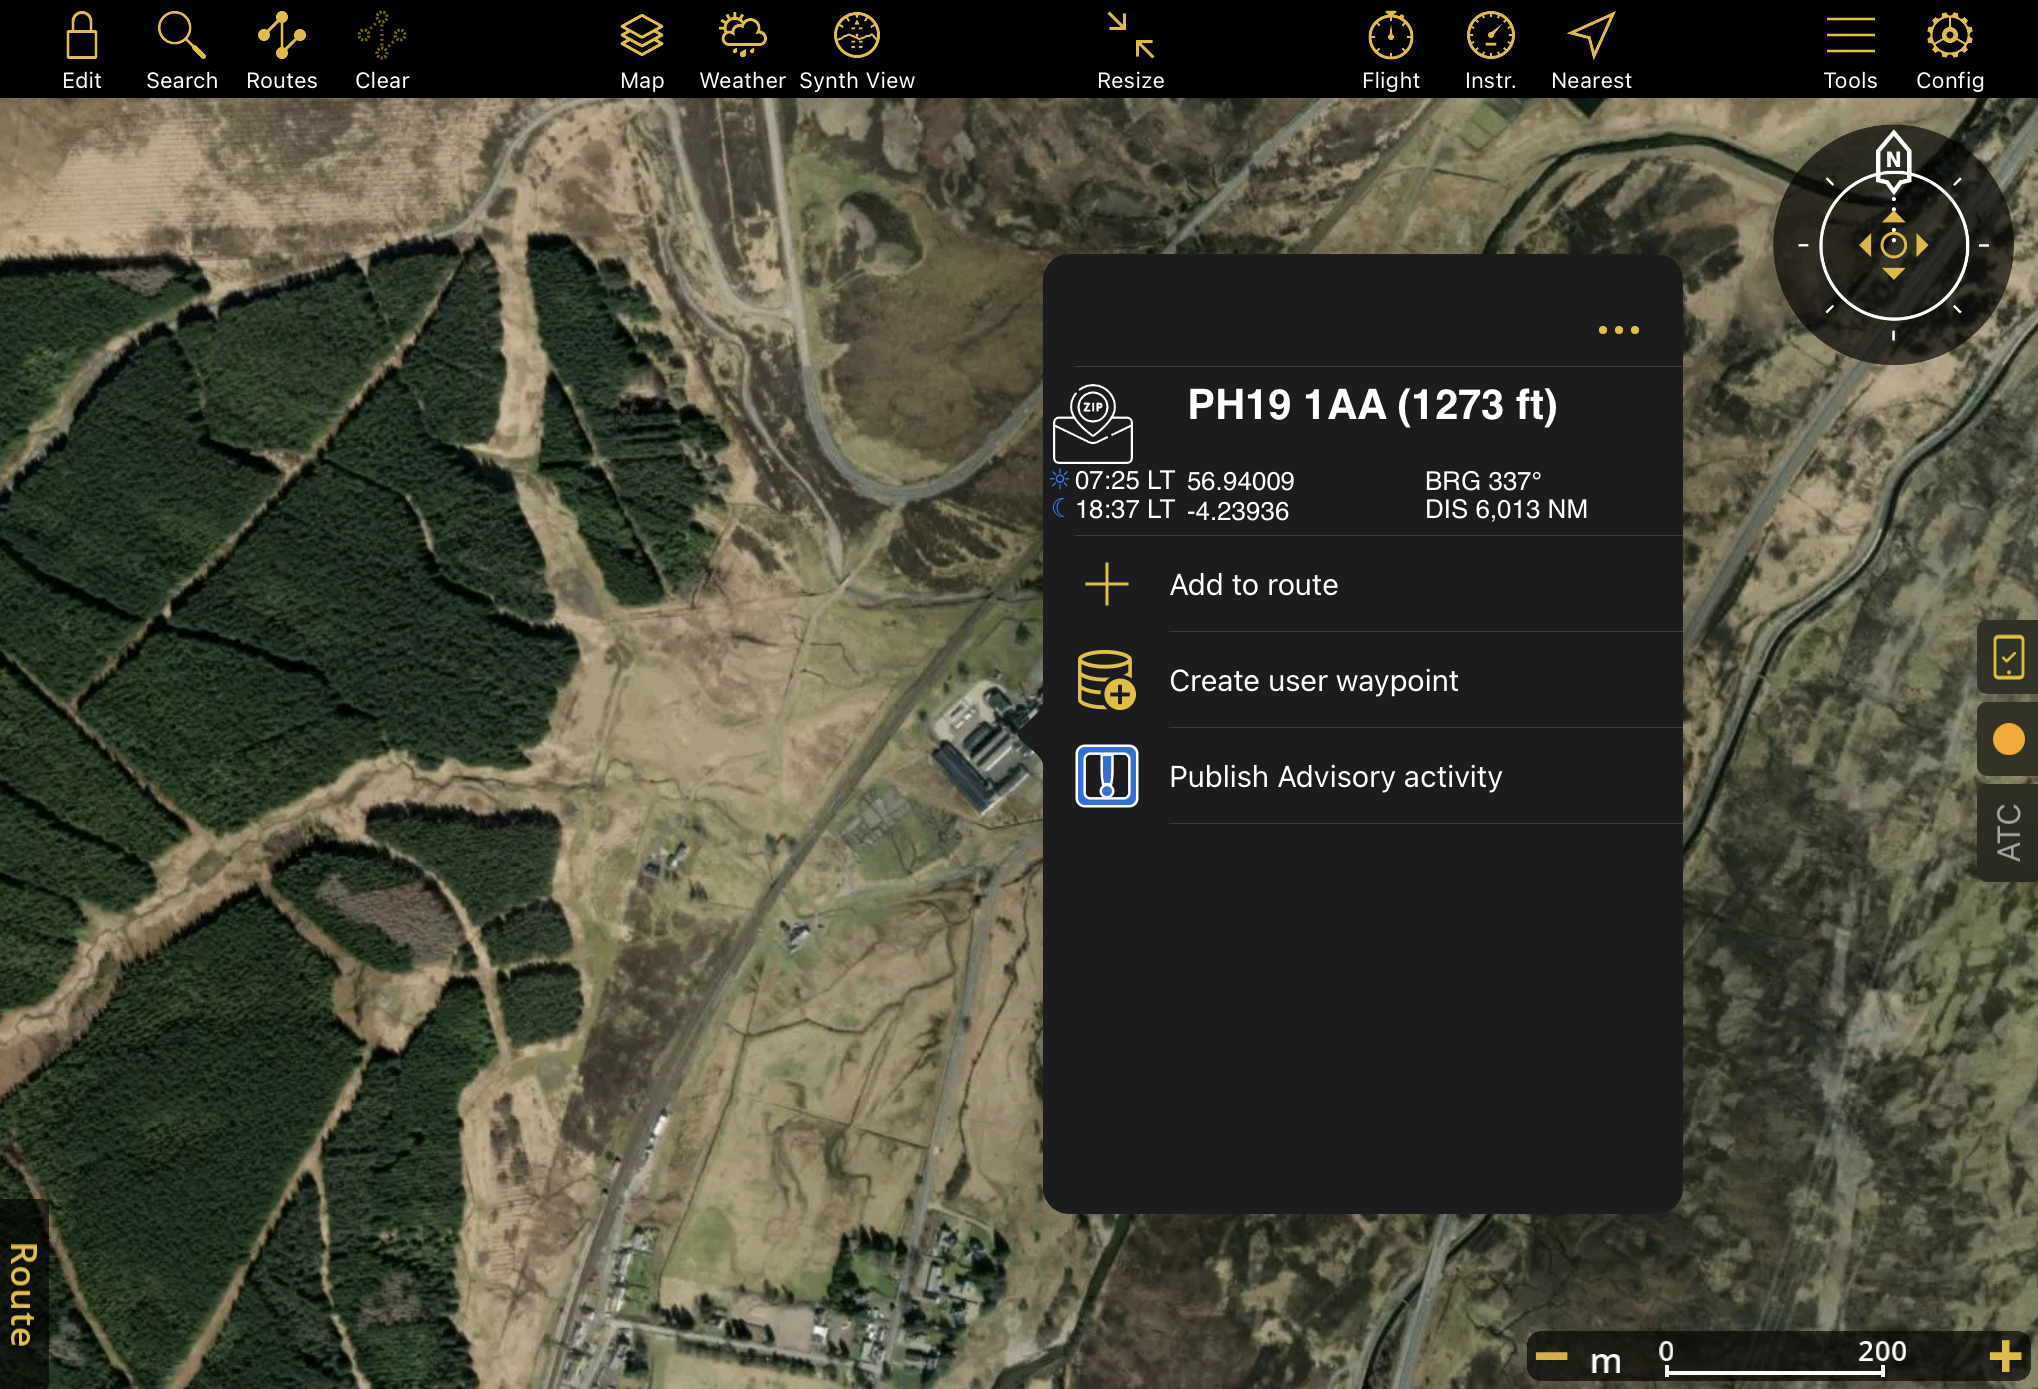
Tap on the search button
Type a UK postal code, such as PH19 1AA
Tap on the result to install the data
Allow some time for the data to finish installing
Re-enter the postal code once the download is complete
Tap on the result to view on the map
Choose your preferred option in the popover
Search by What3Words#
What3words is a feature that allows you to pinpoint a precise location using just three random words separated by periods (in the format word.word.word). This service requires an internet connection.
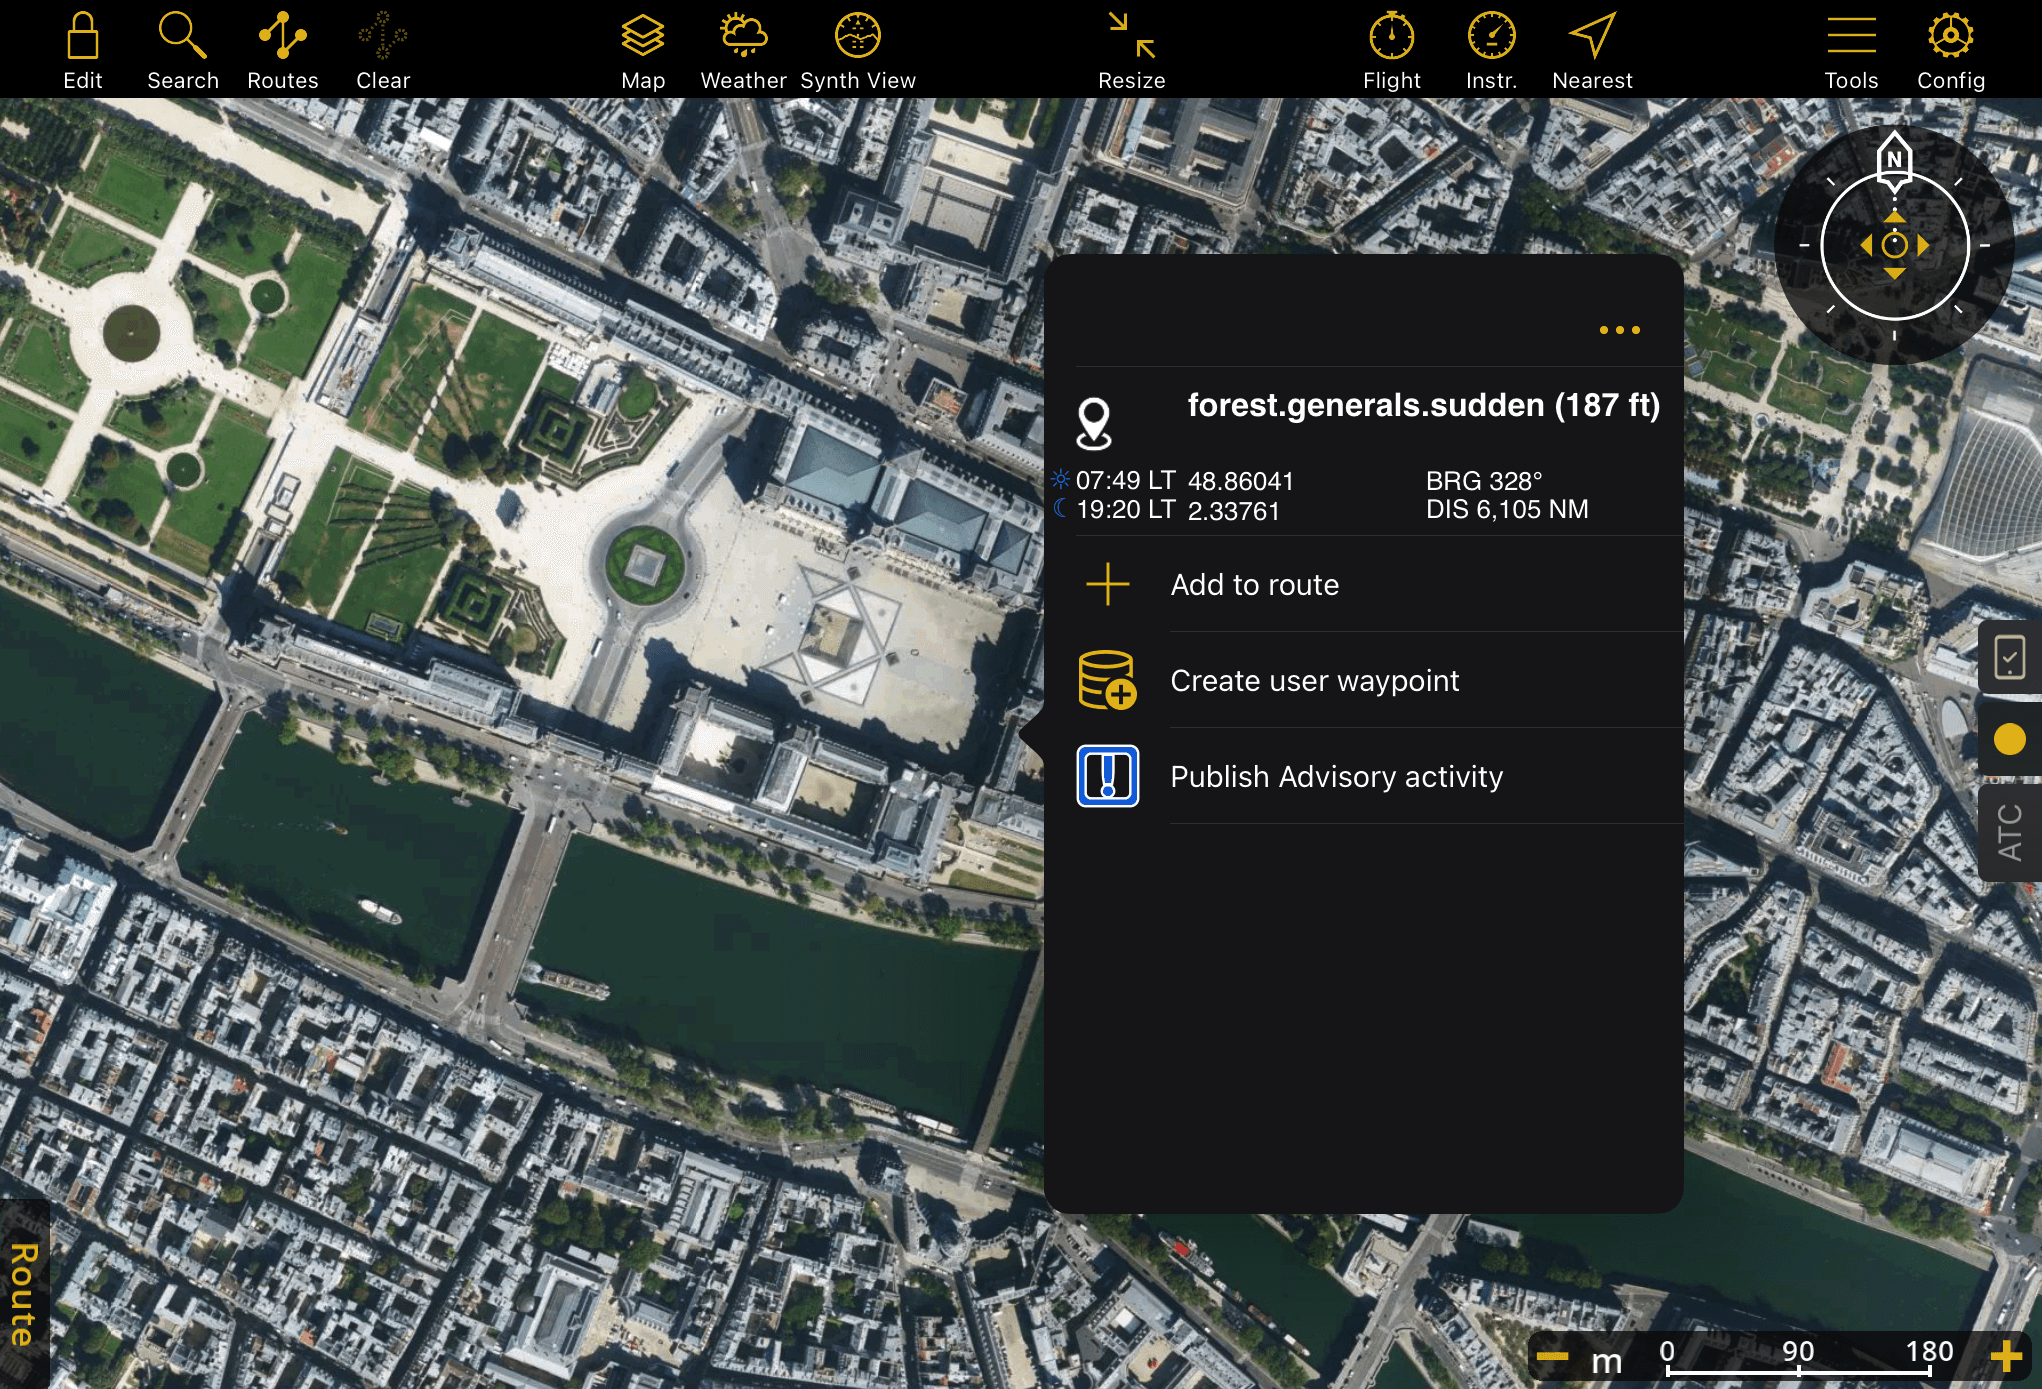
Open your internet browser and go to: https://what3words.com
Enter a street address in the search bar
Choose the option that closely matches the address you entered
Click on the specific square that corresponds to your desired location
The what3words address will appear at the top of the screen
Copy and paste those three words into the search bar of the app
The location functions as a waypoint
Nearby Waypoints#
You can access all nearby waypoints in relation to your current location by going to Search > Nearby.
With the nearby search you can visualize nearby waypoints and their details within 80 NM radius of your position.
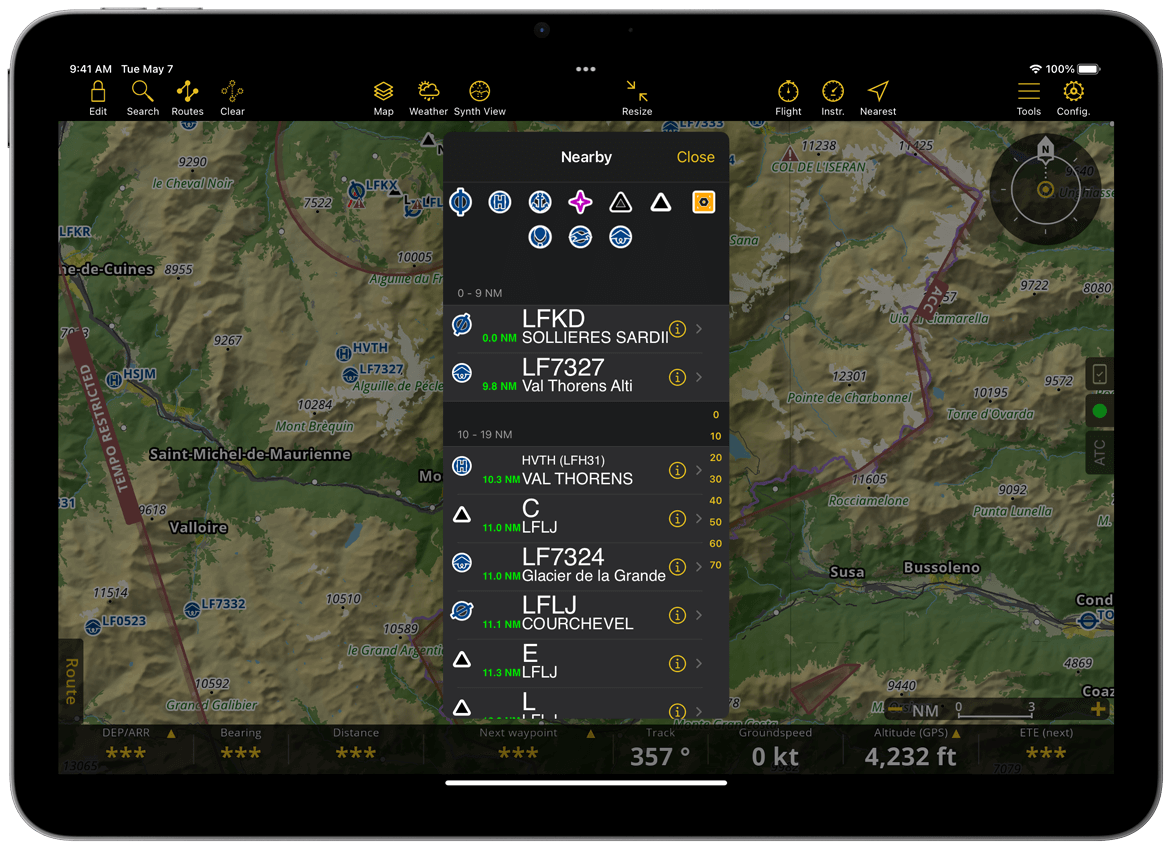
To filter by waypoint type, tap any of the types displayed at the top of the window to select or deselect it.
Tap the ![]() icon to reveal the details of the waypoint with menu actions; More options and Centre on map.
icon to reveal the details of the waypoint with menu actions; More options and Centre on map.
Action Menu#
Tap on a waypoint in the results to gain access to more features. These are also available when tapping on a waypoint on the map, then on the three dots at the top right corner.
The options are:
Centre on map - Center the map on the selected waypoint .
Direct to - Create a route from your current location, to the waypoint.
Simulate HSI - Simulate an HSI on the waypoint. See HSI how to remove the HSI
Simulate VOR - Simulate a VOR. Same principle as for the HSI. See VOR how to remove the VOR
Simulate RMI - Simulate a RMI. Same principle as for the RMI. See RMI how to remove the RMI
Share - You can also share waypoints ‘As GPX’, ‘Text + Google Maps links’ additionally, use the format ‘As Air Navigation Pro format’ for your created user waypoints. See Waypoints.
Download SmartChart - With this option, you can download an area in radius over the selected waypoint for offline data use. See Docks.
New Route to point - Create a route from your location, to this point. Cf. Route Planning.
Create user waypoint - When searching by coordinates, you will have the option to save the result location as a User waypoint. With this option you can mark and save the location with additional information just like the built-in waypoints.
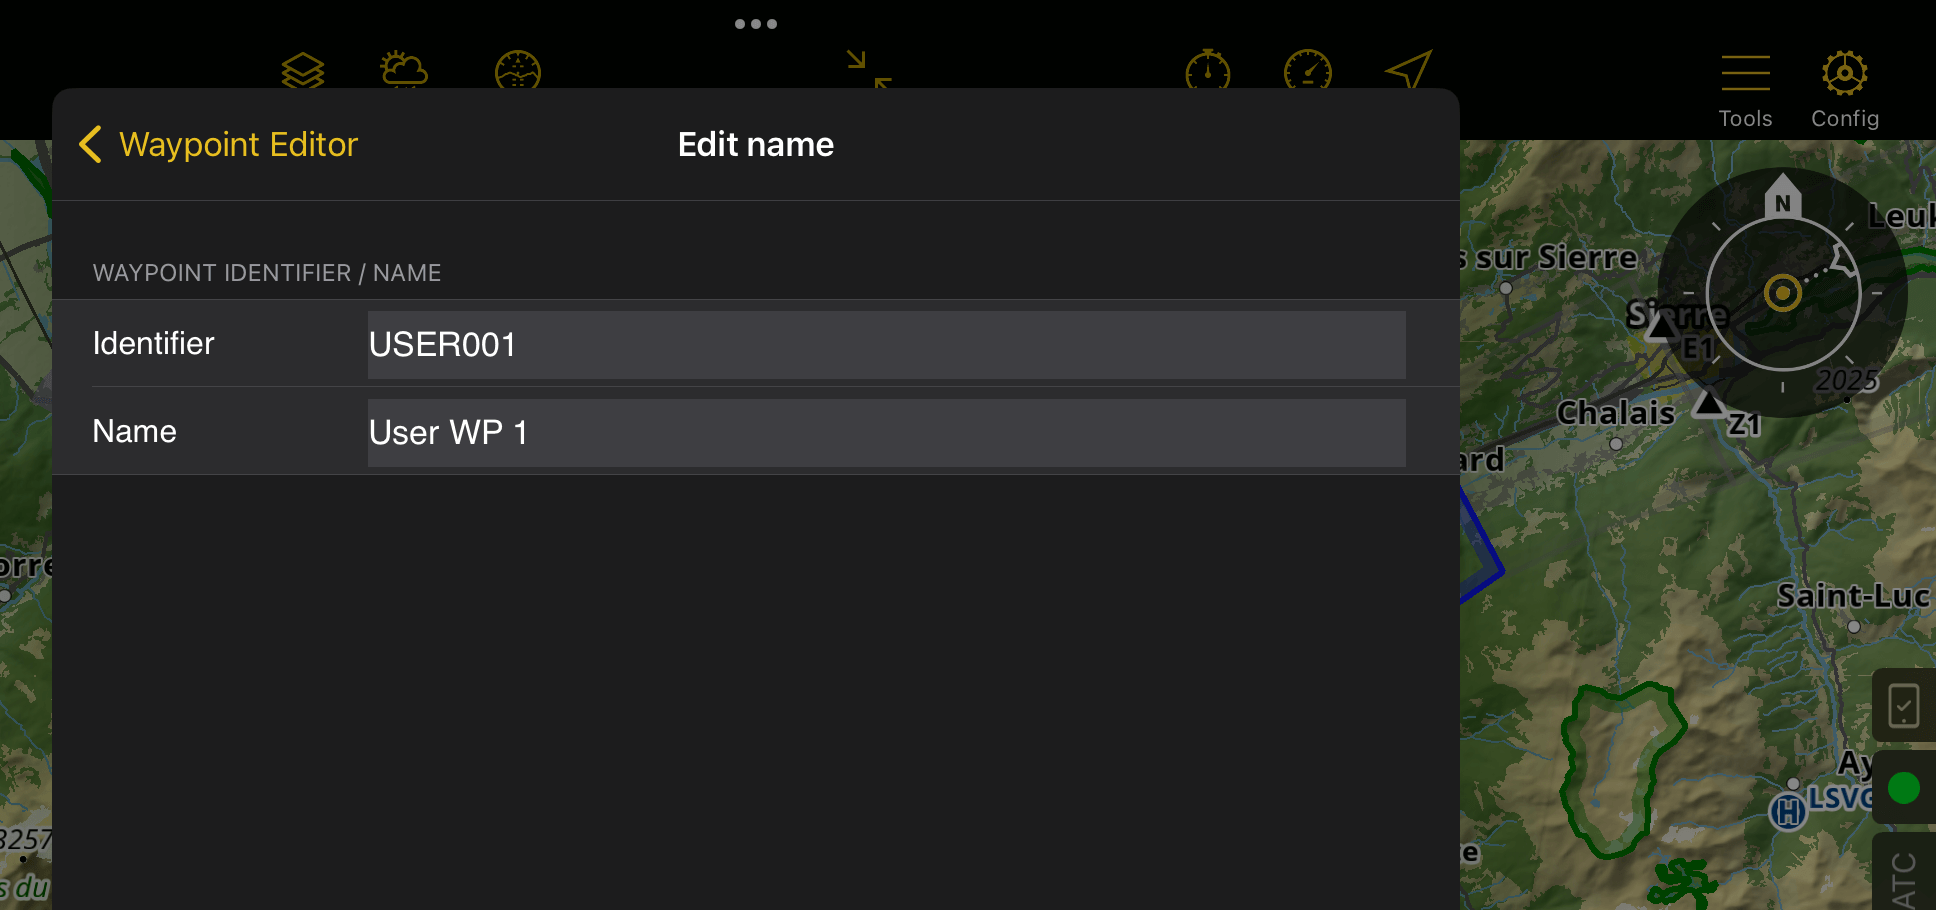
User Waypoints#
In addition to the built-in waypoints coming from the worldwide aeronautical database included on your subscription, Air Navigation Pro offers the possibility to create your own waypoints, refered as User waypoints. You can create, edit, delete, share, back up and restore them in the Tools menu.
Create via the Moving Map#
Long press on the Moving Map where you want to create a waypoint
Tap Save waypoint
The app will automatically fill out the details for you, but you can change them by tapping the information you want to change
Tap Done in the top right corner
Create via Tools#
Go to Tools > User waypoints
Tap + Add a new waypoint
The app will automatically fill out the details for you based on you current position, but you can change them by tapping the information you want to change
When you are done, tap User Waypoints on tablet version or Back on the mobile version
The changes are always saved automatically.
Note
Except the waypoint name, all other fields are mandatory and can not be left blank.
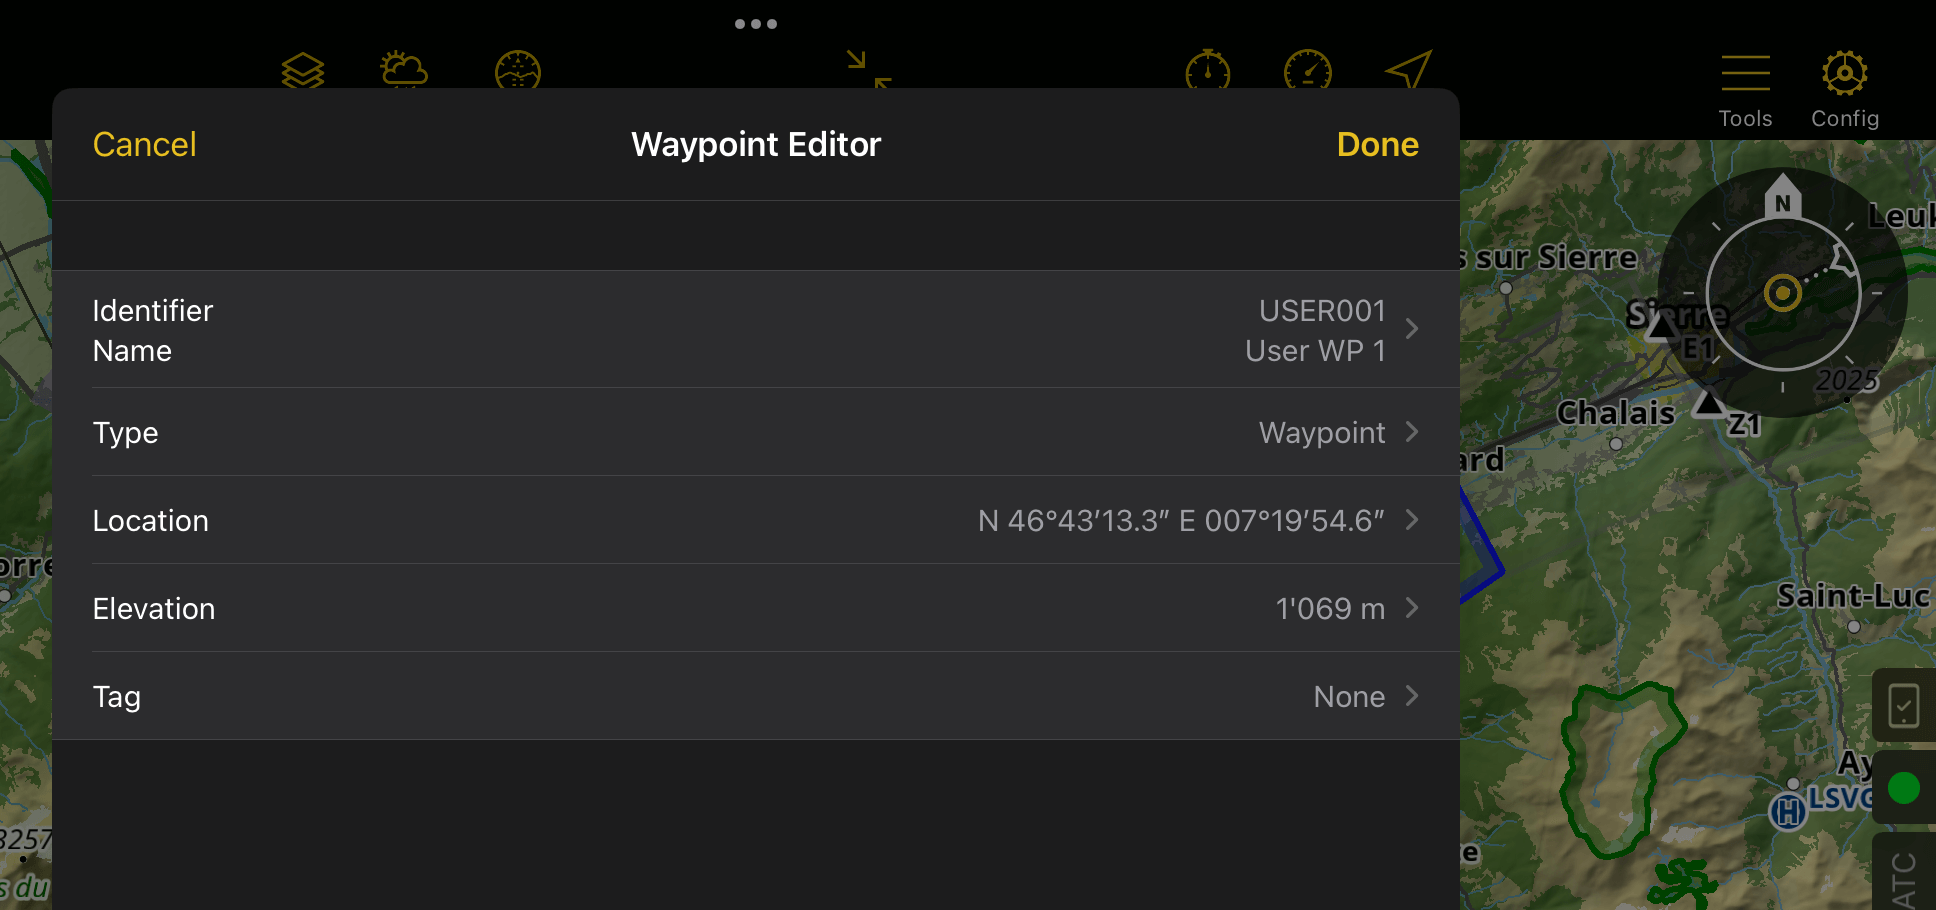
If for example you tap on the Identifier/Name field, a new window will open to let you edit the details. Tap Waypoint Editor on tablet version or Back on mobile version to go back.
Create via URL#
For companies wanting to send waypoints to their pilots, it is possible to create a weblink, send it via email or SMS, and when the pilot click on it, a waypoint or a route is be added in Air Navigation Pro. It is available only on iOS.
The following part is very technical and it explains how to write the weblink. Sending it to the pilot is up to you: use your email, notes, safari or messaging app. Warning: It is not working on Gmail, Chrome.
Supported actions:
Direct-to
Import waypoints to user database
Create route
The URL looks something like this:
airnavpro://direct-to?coordinates=wgs84-decimal&location=46.875_7.234,0.0,WP1,Grass field
And once encoded:
airnavpro://direct-to?coordinates%3Dwgs84-decimal%26location%3D46.875_7.234%2C0.0%2CWP1%2CGrass%20field
It consists of:
URL scheme: airnavpro://
An action: direct-to
Coordinates format: coordinates=wgs84-decimal
waypoint(s): location=46.875_7.234,0.0,WP1,Grass field
Note
The query part of the URL has to be URL encoded in order to support special characters.
Waypoint format for any action can be defined with different values separated by a comma (,). Waypoints are separated by semicolons (;).
Waypoint values:
Coordinates
Waypoint name
Waypoint ID
Elevation (in meters)
Coordinate formats:
WGS84 in DD:MM:SS |
Irish grid without zone |
WGS84 in DD:MM.decimal |
Irish grid with zone |
WGS84 in DD.decimal |
NZ Grid 1949 |
Standard UTM |
NZ Grid 2000 |
UTM with bands |
Swissgrid (CH1903) |
UPS |
UK Grid without zone |
MGRS 100m |
UK Grid with zone |
MGRS 10m |
Swedish grid RT90 |
MGRS 1m |
Swedish grid SWERED99TM |
A waypoint must, at least, contain the coordinates information. The coordinates information may be composed of two values, in this case the coordinates must be linked with an underscore (_). For example, a waypoint description for a wgs84 decimal format: 46.875_7.234
Here is a full example with elevation, ID and name data: 46.875_7.234,0.0,WP1, Antenna
Direct-to#
Direct-to can be achieved by formatting an URL with the “direct-to” command. Only one waypoint can be specified and it has to be in the following format: location=waypoint
Here are some examples of direct-to URLs:
WGS84 decimal:
airnavpro://direct-to?coordinates=wgs84-decimal&location=46.875_7.234,0.0,WP1,Grass field
WGS84 degrees minutes seconds:
airnavpro://direct-to?coordinates=wgs84-ddmmss&location=N 12°34'56''_W 78°12'34'',0.0,WP1,Grass field
Swissgrid CH1903:
airnavpro://direct-to?coordinates=swiss&location=602030.68_191775.03,0.0,WP1,Zimmerwald
Import waypoints to user database#
A list of waypoints can be imported directly into the user database with a specially formatted URL with the “add-waypoints” command. A list of waypoints can be specified and it has to be in the following format: waypoints=point1;point2;point3
Here is an example of add-waypoints URLs:
airnavpro://add-waypoints?coordinates=wgs84-decimal&waypoints=46.123_6.543,125.0,WP1,Grass field;47.113_7.143,225.1,WP2,Forrest;45.153_6.643,1225.0,WP3,Antenna
Airspaces#
Our extensive aeronautical database, included in any subscription and updated every 28 days following the AIRAC cycle, offers more than 65,000 airspaces of different classes, covering the entire world. You can install and update it in Configuration > Manage Data and Products. We recommend enabling automatic updates to ensure you always fly with the latest aeronautical information.
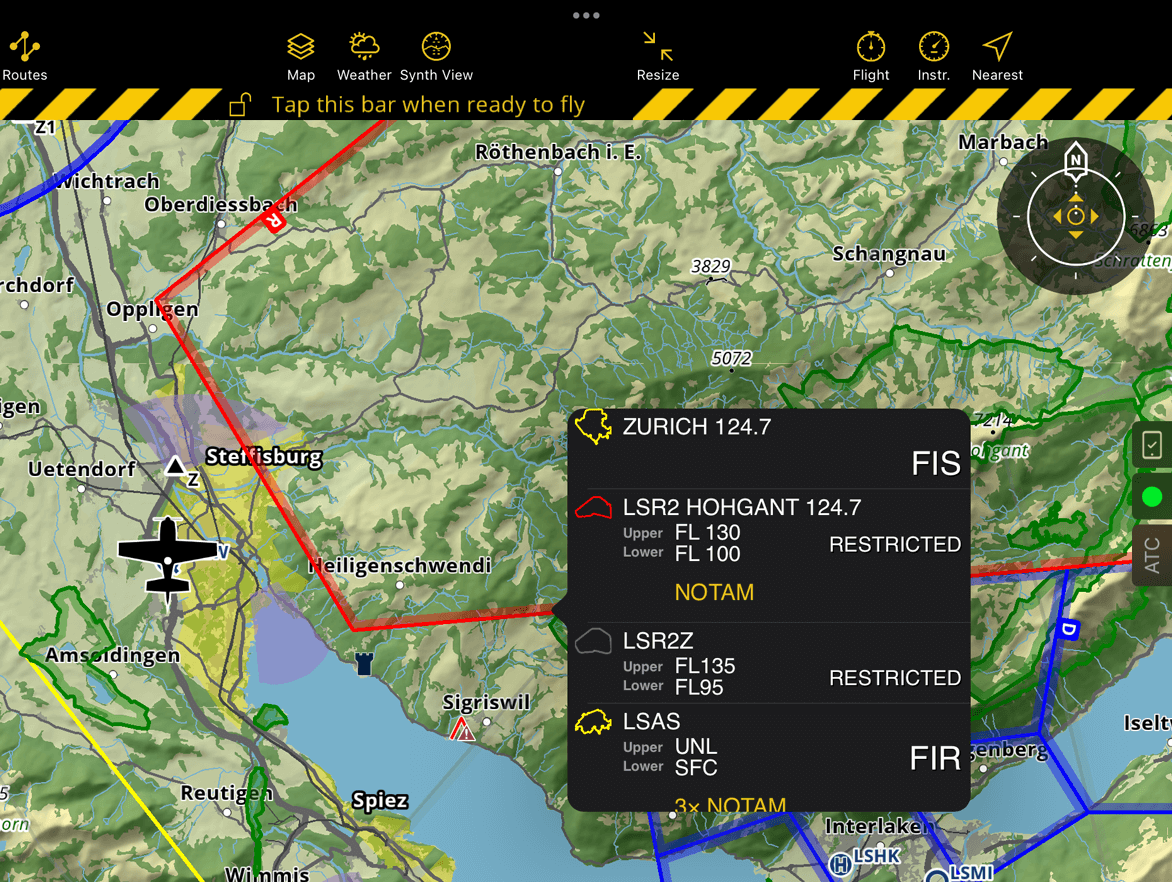
Tapping any point on the map will display a popover with detailed airspace information for that area.
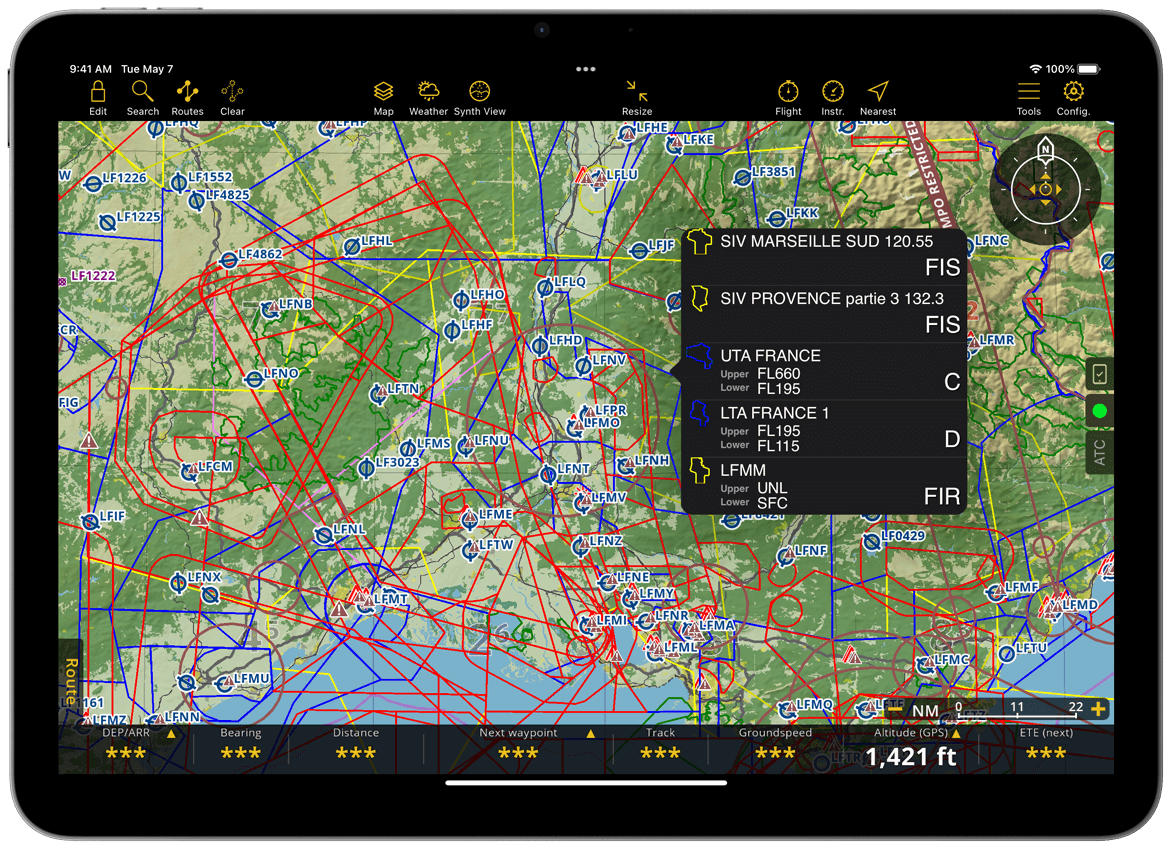
Airspaces have different colors based on their class. Below is the color legend to help you quickly identify each airspace class on the map:
Airspace Class |
Color |
A, B, Danger, Prohibited, Restricted, MATZ (MIL) |
Red |
C, D, E, F, CTR & Recreational |
Blue |
TMZ & Custom Airspaces |
Black |
TSA, TRA |
Pink |
Nature Reserve |
Green |
G, FIS & FIR |
Yellow |
Airspaces can be activated or deactivated via a NOTAM. Air Navigation Pro reflects these status changes with color. When inactive, the airspace will be shown in gray. If an airspace will become active within the next 24 hours, it will appear in its original color but with reduced opacity. Once activated, it will be displayed in its full color.
Hint
During Route Planning, you can set a departure time in the future and the map will show the activation status of airspaces for the time of your flight.
Following aeronautical chart design standards, airspaces are displayed with a label showing their class, floor and ceiling:

You can manage the display of airspaces in the Moving Map via Map Options > Airspaces. You can also display airspaces in the Profile View.
Weather stations#
Air Navigation Pro displays on the map reliable weather stations that are regularly updated. Tapping on the weather icon displays the weather information.
METAR/TAF stations have different coloured cloud icons which are to let you know about the flying condition: - Green with “VMC” - VMC - Visual Meteorological Conditions (VFR allowed) - Amber with “VMC” - Marginal VMC (Close to the limit for a VFR flight) - Red with “IMC” - Instrument Meteorological Conditions (Only IFR flights) - Black with “TAF” - No METAR but has TAF data - Grey with “-” - No data/network available or loading in progress
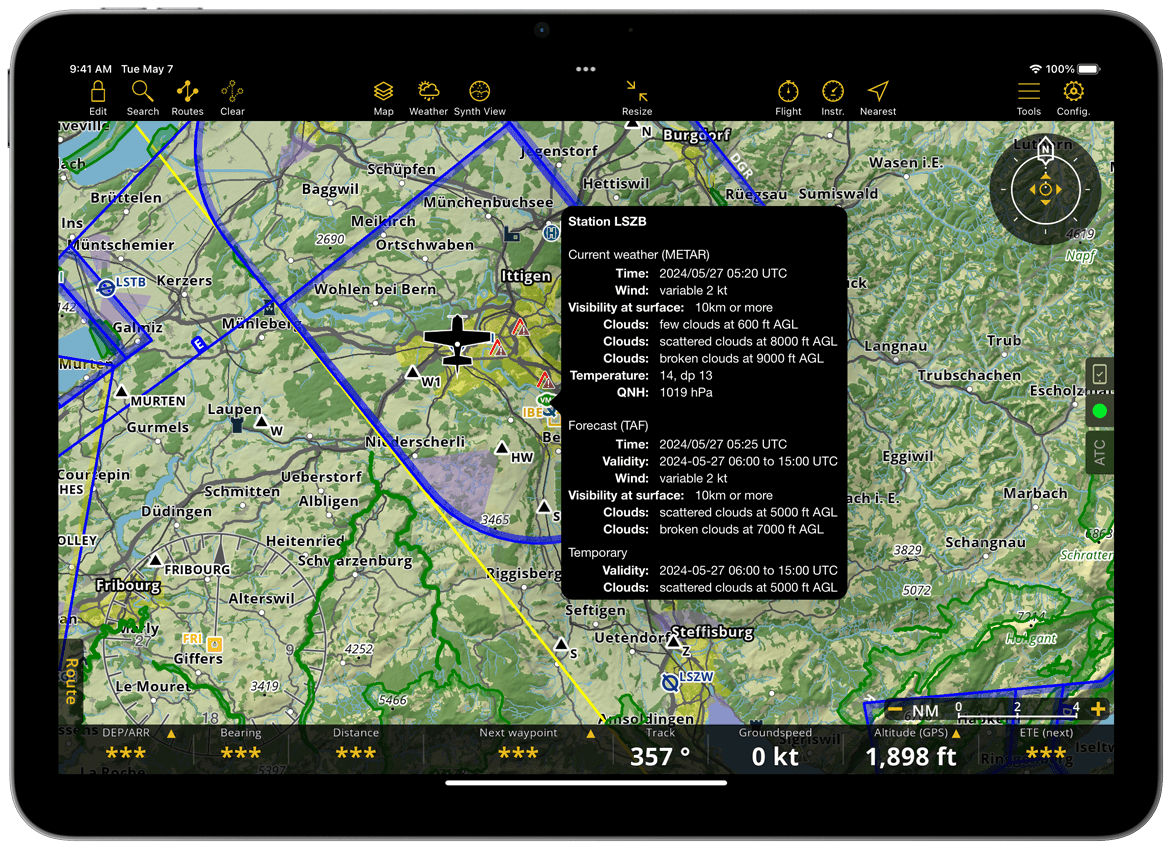
Air Navigation Pro reads the METAR and TAF and shows them in a user-friendly readable format. You can see the raw METAR/TAF by enabling the option “Raw METAR/TAF” under Configuration > Settings > MISC.
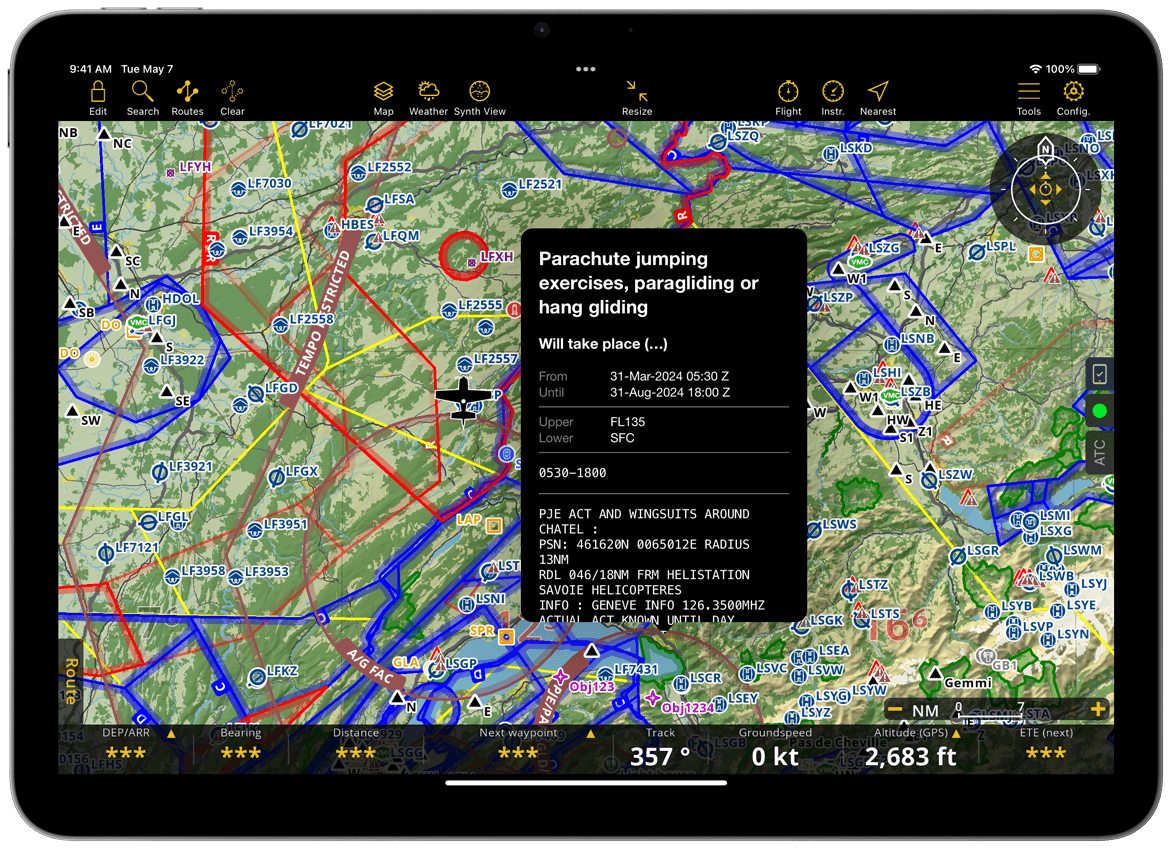
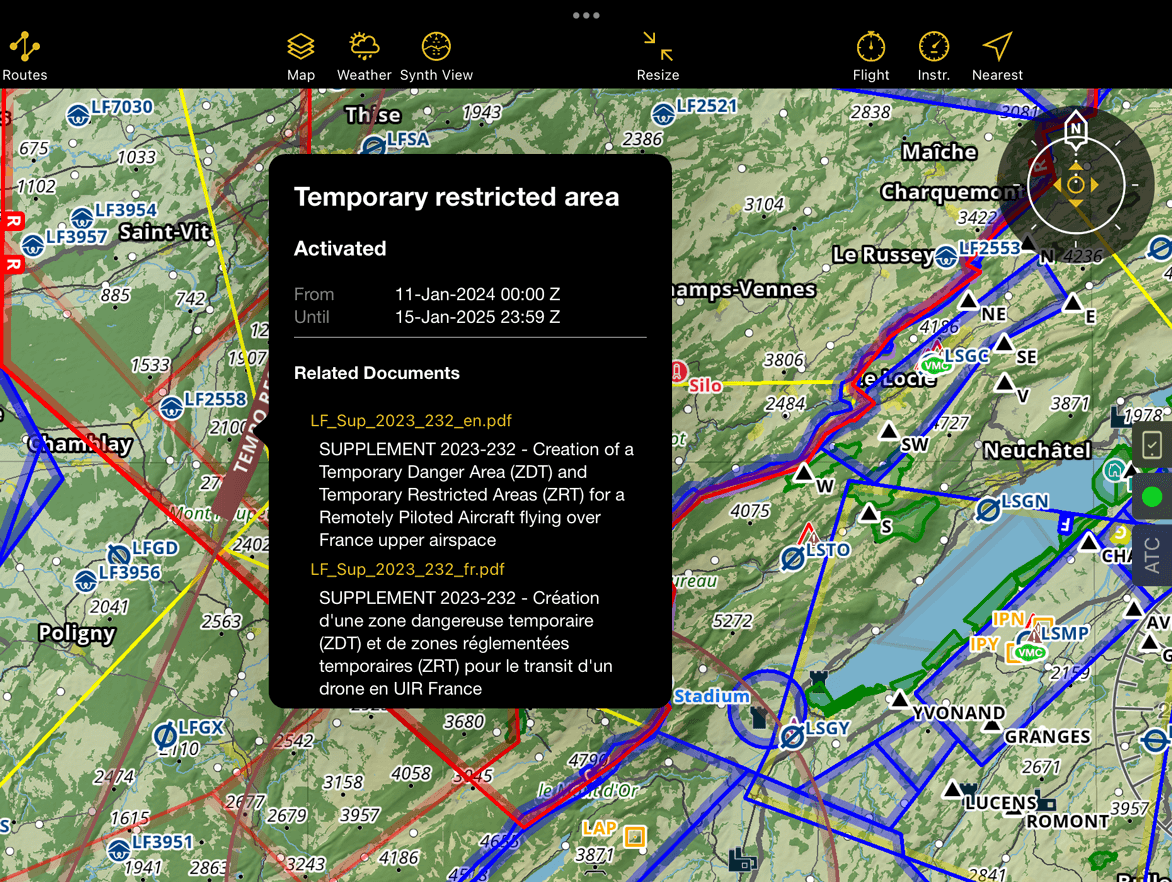
NOTAM#
General information#
Air Navigation Pro provides NOTAM information. This feature comes with any Subscription plans. NOTAMS are continuously updated when you are online. NOTAM that are active are highlighted in brown.
Not all NOTAM are displayed on the map: Air Navigation Pro filters out the least relevant ones to display only the most pertinent information. All NOTAM are still available when creating a preflight information briefing (see NOTAM).
Air Navigation Pro also hides NOTAM which will be applicable in a long time. You can change the activation period in Map Options > NOTAM.
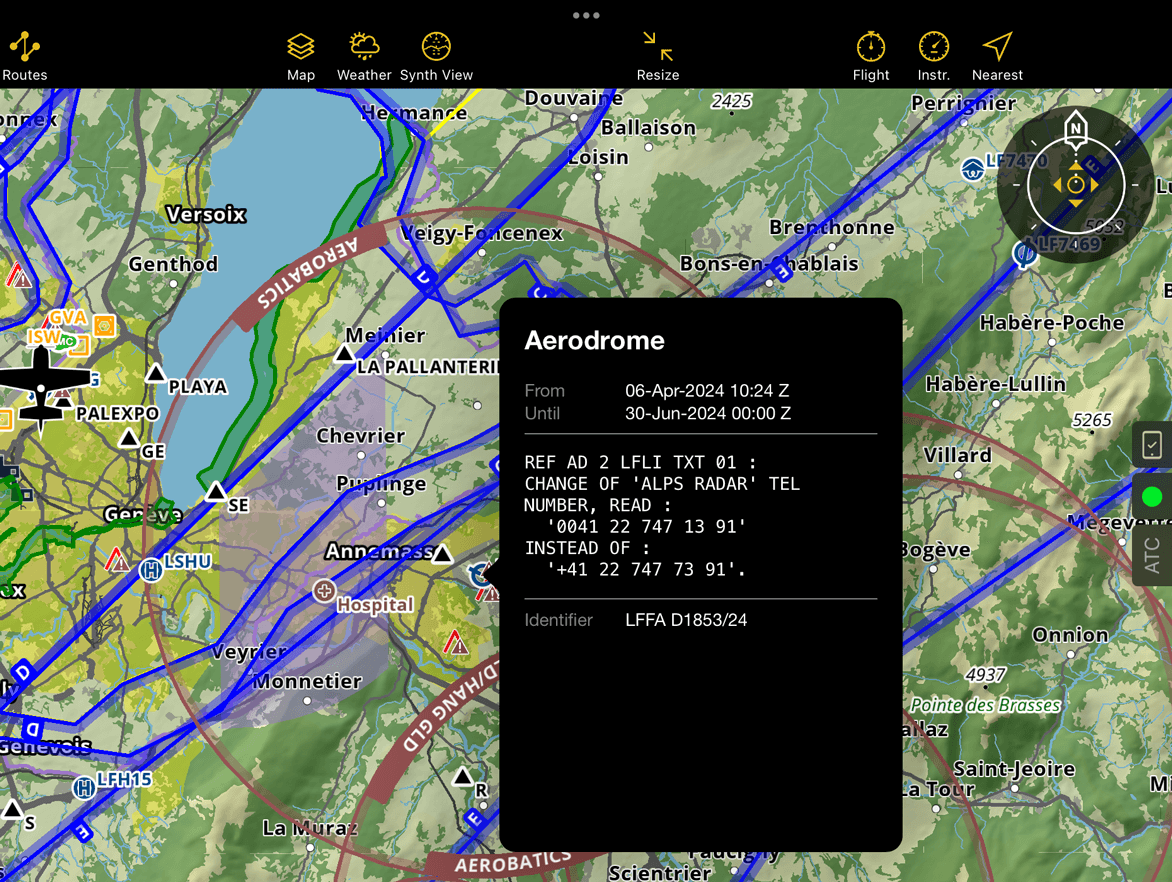
You can tap on any NOTAM to obtain detailed information. Some NOTAM also relate to documents that may be downloaded and viewed directly from Air Navigation Pro, for example SUP.
NOTAM can also be shown/hide on the Profile View.
Types of NOTAM#
With their exact shape#
When Air Navigation Pro knows the exact shape of the NOTAM, it will display it precisely on the map. When the geometry of the NOTAM cannot be determined, and if the radius is small enough, it is displayed as a circle centered on the NOTAM position.
NOTAM belonging to an aerodrome#
This NOTAM is seen in a triangular icon with an exclamation point. Example is a NOTAM about the runway of an aerodrome, the NOTAM icon is attached to the icon of the aerodrome.
NOTAM belonging to an airspace#
If the NOTAM belongs to an airspace, Air Navigation Pro can sometimes detect it and display the NOTAM in the airspace, rather than displaying a circle all around the airspaces. Tap on the airspace to get more information about the NOTAM.
Note
NOTAM may affect the activation status of Restricted and Danger airspaces. While planning a flight, the app dynamically updates the airspace color to reflect its activation status based on your selected Departure Time. See more in Route Planning.
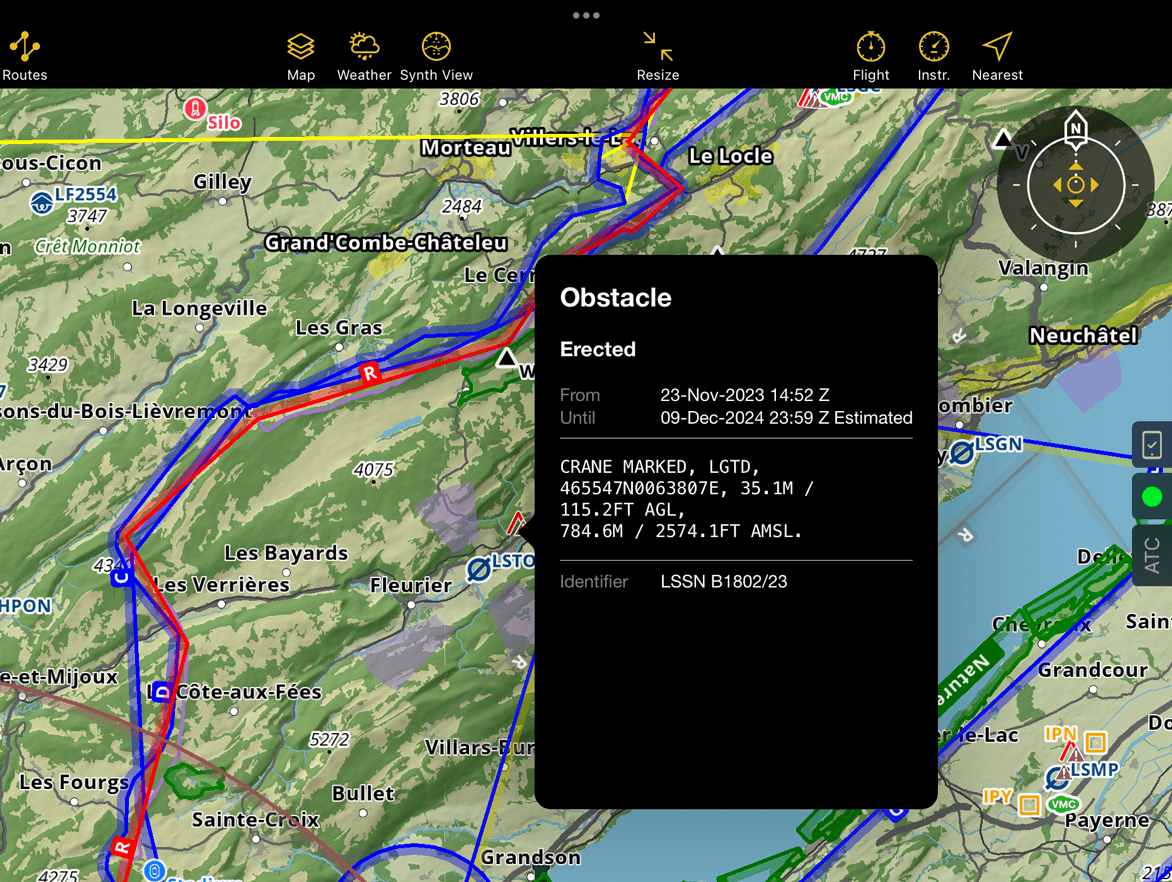
For obstacles#
NOTAM for obstacles are displayed as obstacles with a NOTAM icon.
NOTAM that point to documents#
Some NOTAM contains documents and it is now possible to view or open them. It is attached inside the NOTAM popover.
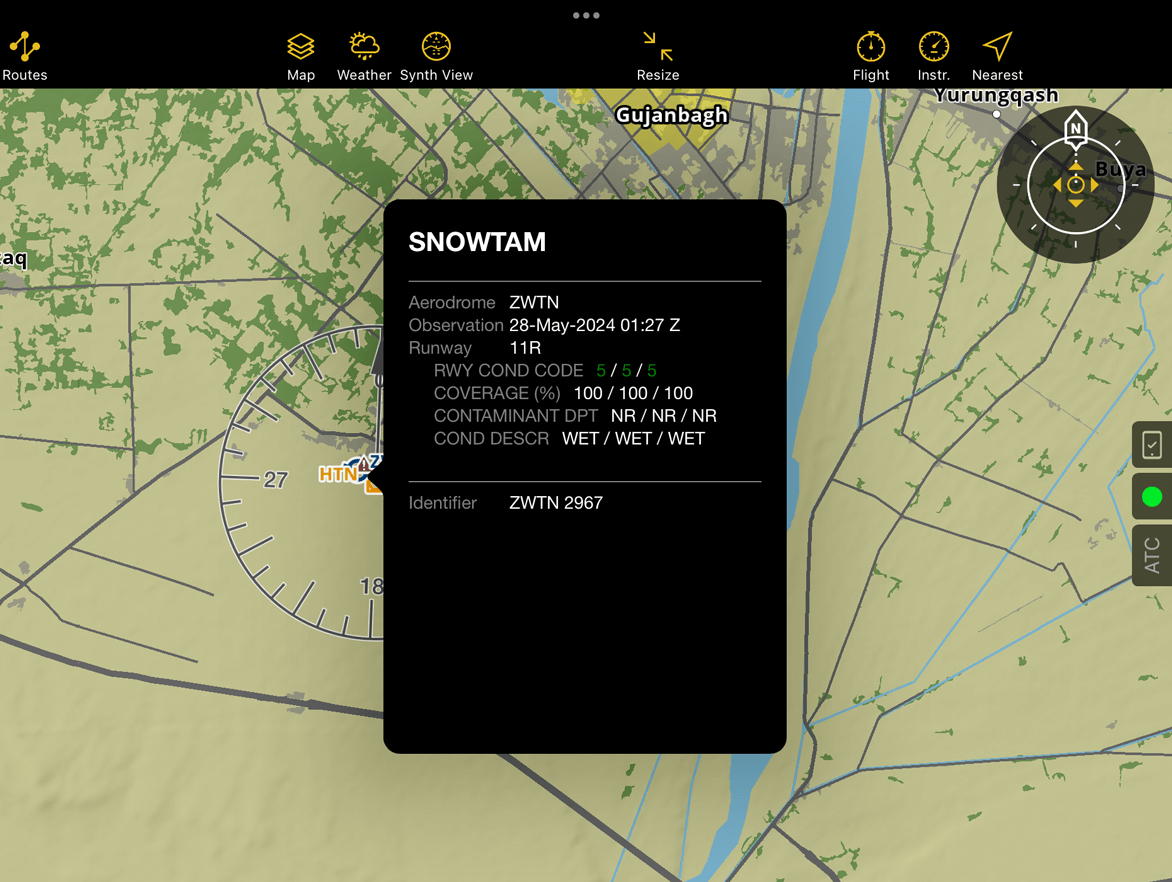
SNOWTAM & ASHTAM#
The application also support and displays SNOWTAM & ASHTAM on the map with their details.
Advisories#
They are published by other users to inform about special activities in the sky.
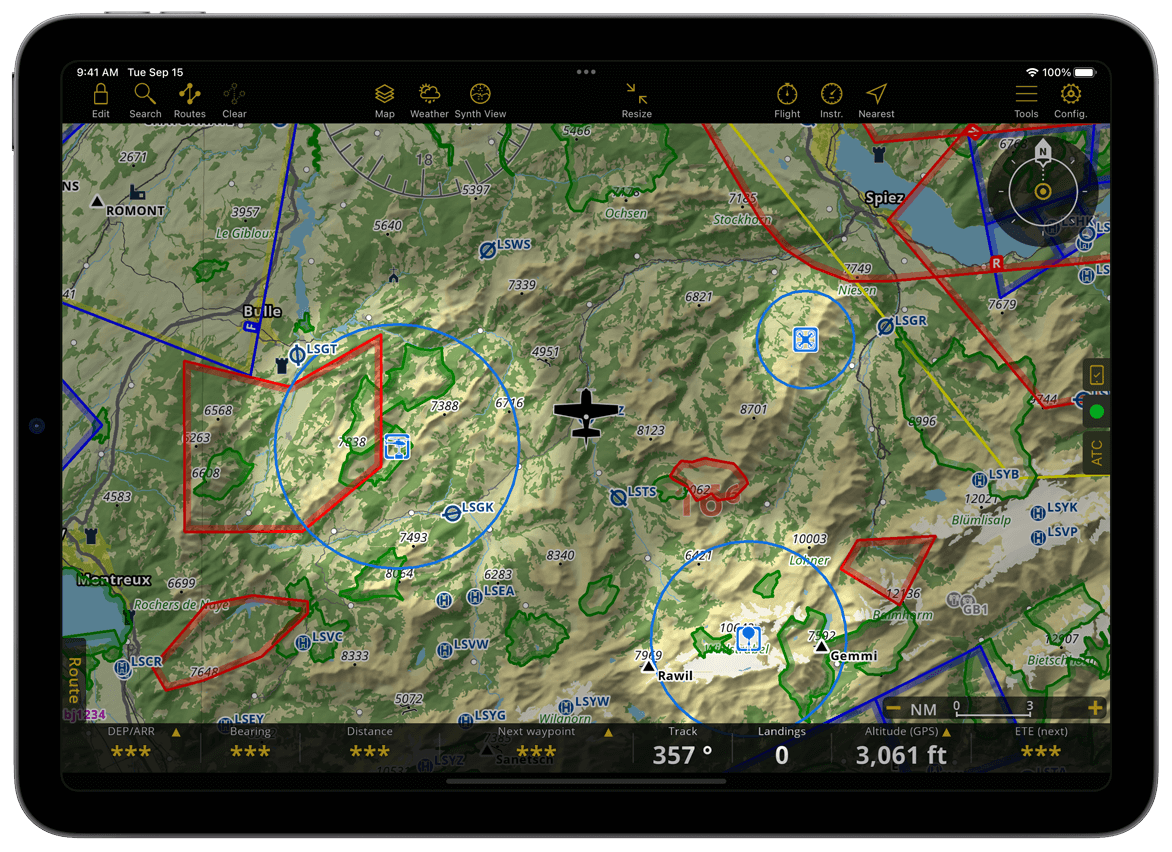
Air Navigation Pro offers you to see advisories published by other users and to publish your own.
Note
Air Navigation Manager customers can create and edit advisories from the web service.
Life cycle#
For advisories where the user is the author, they are displayed at all times up until they expire. While advisories that come from other users, they are displayed 12 hours before their start period and disappear as soon as they expire.
Publish Advisories#
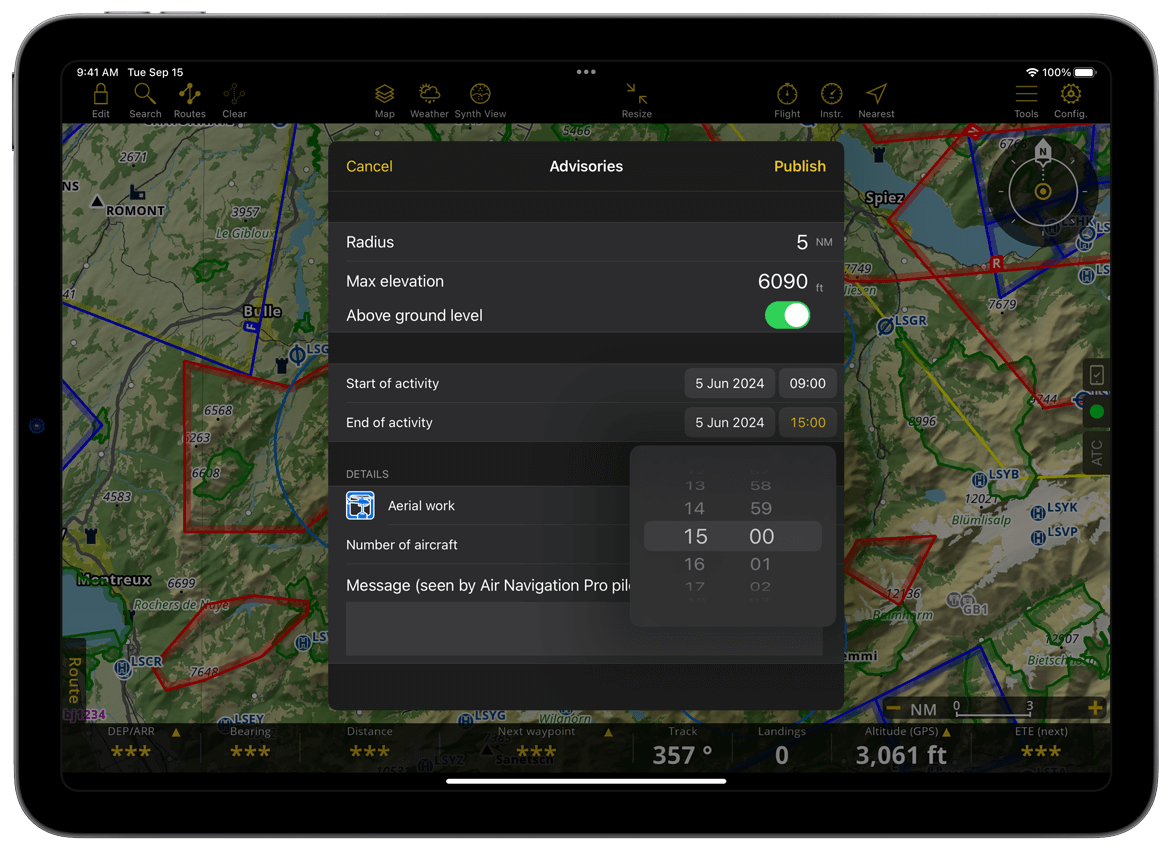
You need to have an Air Navigation account. See your Account in Configuration > Account
Move the map to where you want to create an advisory
Long press on the moving map
Select Publish Advisory activity
Provide all necessary information on the Advisory window: Radius, Max elevation, Start and End of activity, Type of advisory, Number of aircraft and Message.
Tap Publish
Edit Advisory activity#
You can only edit your own advisories.
Tap the advisory activity on the map
Tap Edit on the popup window
Edit the details you want to update
Tap Publish
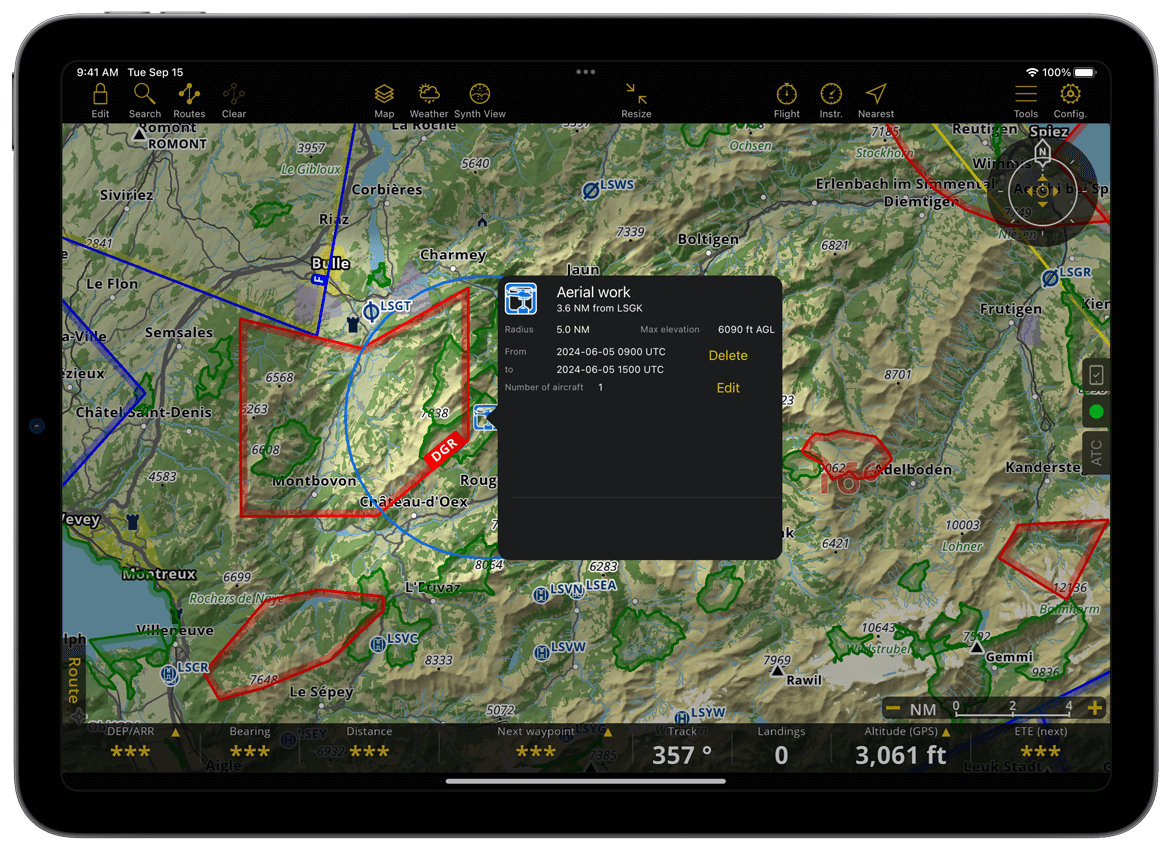
Delete Advisory activity#
You can only delete your own advisories:
Tap the advisory activity on the map
Tap Delete
You can manage the display of advisories on the map in Map Options > Advisories.
Obstacles#
General information#
We offer a wide-ranging obstacle database for selected countries as part of our Subscription plans. The database is updated weekly to ensure you have the latest obstacle information available for your flight. You can install the obstacles database from Manage Data and Products. The display of obstacles on the Moving Map can be managed in Map Options > Obstacles.
You can also display obstacles on the Profile View.
Types of obstacles#
Points#
Obstacle points are represented by icons. To avoid cluttering at lower zoom levels, only one icon will be displayed even if multiple obstacles are located in the same area. Zooming in will display more detailed information for each individual obstacle in that area.
Icon
Meaning
Icon
Meaning
300 ft Obstacle
Wind Turbine
300 ft Obstacles
Wind Turbine Lighted
300 ft Lighted Obstacle
Power Pole
300 ft Lighted Obstacles
Chimney
500 ft Obstacle
Tank
500 ft Lighted Obstacle
Church
Tower
Factory
Lighted Tower
Mountains
Lines#
The app does not offer decluttering for lines, so obstacle lines are not visible at lower zoom levels. Once you zoom-in enough to allow a clean display, they will be displayed. For Norway, you can color power lines based on their height from ground in Map Options > Obstacles.
Surfaces#
Obstacle surfaces are not very common. They are displayed on the map as areas with a red border and clearly labeled as Obst. An example of an obstacle surface is an area with several wind turbines, which is displayed as a single marked area instead of identifying each turbine as obstacle individually.
Third party charts#
Air Navigation Pro supports a wide variety of charts that can be displayed on the moving map. This feature is very helpful for users who are used to conventional maps but wish to navigate on them in a very less hassle way. The application provides reliable and accurate charts from third-party sources and can be acquired through the Store in the application or on our website. You can visit this page to check our partners that are providing these awesome charts.
Note
You can install one or more maps and display them all simultaneously. When maps overlap, they will be prioritized based on the order specified in Map Options > Maps. Additionally, you can import your own maps by following these easy steps in the User Maps section.
ICAO Chart#
VFR Chart#
Alps VFR Chart#
Topographic Chart#
Glider Chart#
Helicopter topo Chart#
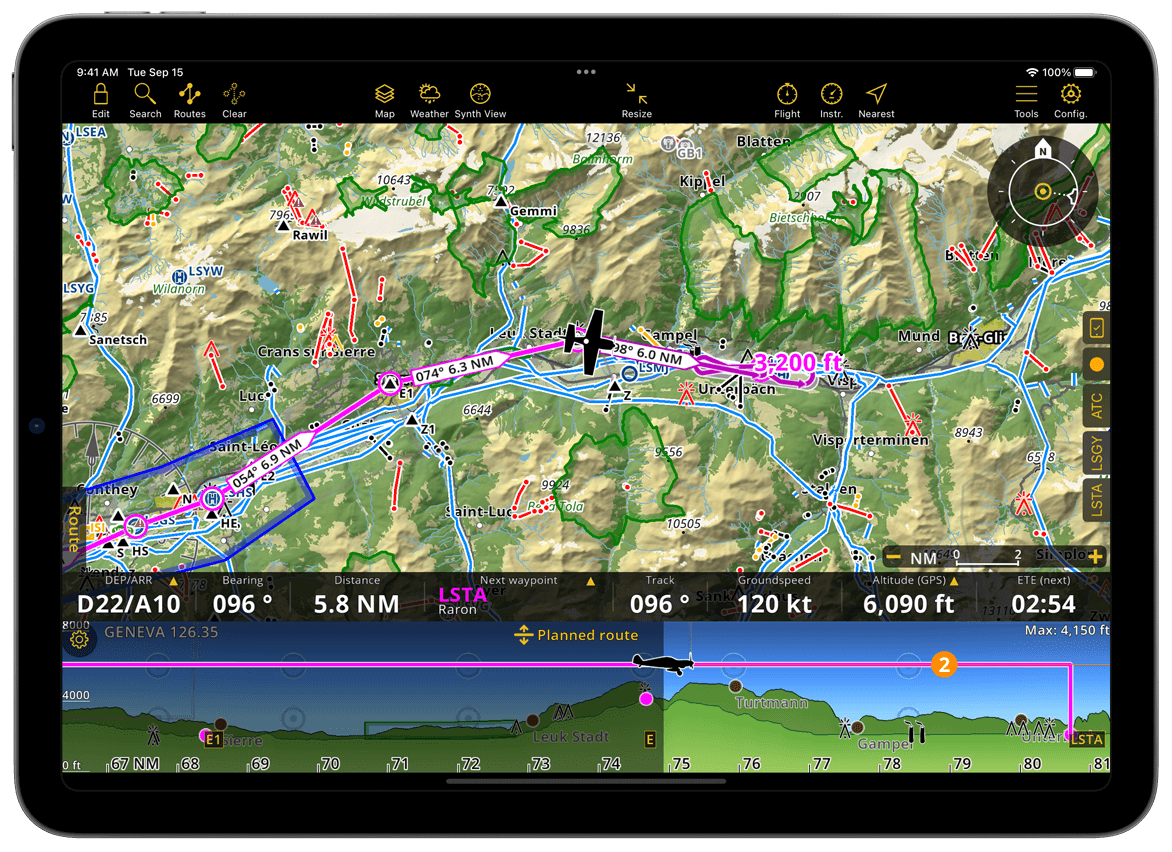
Approach charts#
Air Navigation Pro supports Visual Approach Charts and Instrument Approach Charts.
Countries that have approach charts#
The approach charts are going to be displayed on the map.
Here is the list of the countries that we have approach charts for:
Argentina |
Austria |
Baltic (EST,LVA,LTU) |
Benelux |
Brazil |
Chile |
Colombia |
Czech + Slovakia |
Danemark |
Finland |
France |
Germany |
Greece |
Israel |
Italy |
Norway |
New Zeland |
Russia |
Slovenia |
Spain |
Switzerland |
Uruguay |
USA |
South Africa |
You can purchases them here, by selecting one of the countries above.
You can install all available approach charts from a country or select the ones from specific waypoints and display the charts as you need them. This product can be acquired as individual products or from a subscription package.
Install approach chart#
Tap Config > Store
Tap Restore - wait until the app loads all the products’ information
Tap on the desired Georeferenced approach charts package
Select which charts to install or tap on Install all
Display them on the moving map#
Tap on an aerodrome in a country for which you have installed approach charts
Scroll down and tap an approach chart.
Example: LSTA Approach chart
Hide approach charts#
On the menu bar, tap the Clear icon.
Tap Hide approach.